Showing posts with label notification. Show all posts
Showing posts with label notification. Show all posts
Tuesday, April 18, 2017
Android phone ki notification ko save kaise kare
Android phone ki notification ko save kaise kare

Is post me janenge ki android phone ki notificatin ko save kaise karte hai aur backup kaise banate hai.
Aap apne phone me bahut se apps rakhte honge jinki notifications hame aate rehti hai jo ki hame notification bar me show hoti hai aur ham unhe swipe kar ke hata dete hai but kabhi kabhi hota ye hai ki ha kuch jaroori notifications bhi clear ho jati hai,
jiska hame baad me dhyan aane parrham pachtate hai but kuch nahi kar sakte. lekin is post ko padhkar aap aasani se apne phone ki saari notification ko save kar ke rakh sakenge Notibox app ki madad se.
Aap apne phone me bahut se apps rakhte honge jinki notifications hame aate rehti hai jo ki hame notification bar me show hoti hai aur ham unhe swipe kar ke hata dete hai but kabhi kabhi hota ye hai ki ha kuch jaroori notifications bhi clear ho jati hai,
jiska hame baad me dhyan aane parrham pachtate hai but kuch nahi kar sakte. lekin is post ko padhkar aap aasani se apne phone ki saari notification ko save kar ke rakh sakenge Notibox app ki madad se.
Android phone ki notification ka backup kaise banate hai
Ham yaha par puri process step by step bata rahe hai.
1. Notibox app download kare.
Download
2. Download hone ke baad open kare. open karne par screen me notibox app ke features dikhaye jayenge image ke dwara unhe skip kar de.
3. Skip karne ke baad Enable app me click kare.

4. Iske baad aapse Notification access ke liye pucha jayega to aap Notibox ko select kare aur setting save kar de.

Read Also :
? Android phone ke liye top 5 internet browser.
? Google ki top 20 magic in hindi.
? Top 5 apps android smartphone ki screen record karne ke liye.
? Webpage ko pdf file me convert karne ke top 5 online tool.
5. Iske baad screen me aapke phone me installed sabhi apps aapko show honge. To aapke jis-jis apps ki notifications ko save karna hai unhe select kare aur Done me click kare.

6. Itna karne ke baad is app ki settings ka setup acchi tarah se ho jayenga aur aapke phone ki notification is app me is tarah se show hongi (image me dekhe) aur aap isme click karke inhe open bhi kar sakte hai.

To friends ab aap notification clear kar bhi denge to koi problem nahi.
Aapko ye trick kesi lagi hame comment me bataye. ye trick apne friends ke sath bhi share kare aur esi hi tricks daily fb par pane ke liye hamara Fb Page like kare.
Go to link download

Tuesday, March 28, 2017
DAWIN Distributed Audit Wireless Intrusion Notification
DAWIN Distributed Audit Wireless Intrusion Notification

DA-WIN is the end of the manual PCI wireless scan DA-WIN provides an organisation a continuous wireless scanning capability that is light touch and simple. It utilises compact and discreet sensors that can easily be deployed reducing the total cost of protection and simplifying the effort required for absolute, categoric regulatory compliance.
BYOD - Bring Your Own Disaster
Marketing directors everywhere need to be able to swager (see urban dictionary not a spelling mistake - aka swagger) into the office. They NEED to be able to use an I-P-PAD-POD-PONE with teeniest screen to do their job.
DO THEY REALLY need to introduce that POX, VIRUS and MALWARE infected digital equivalent of TYPHOID Mary on to your network
DA-WIN provides an organisation a continuous wireless scanning capability that is light touch and simple. It replaces the network surveillance that head of risk made you take out after the last gartner conference
What is DA-WIN
DA- WIN (pronounced DARWIN) is the evolution of wireless security scanning. Developed by a team that had a significant impact on the field of 802.11 security, it embraces the true-ism that most organisations dont like or embrace network IDS technology and so are unlikely to welcome, invest in or support an IDS implementation in a more specialised area like Wfi.
Scanning is a costly, regulatory requirement for many - Yet it often provides little security protection because it only measures the threat on 4 or 5 days a year. How many CIOs would be happy with a firewall or anti-virus that worked for 1 week in 52?
How we solved the problem
Purpose built, designed from the ground up, Wireless IDS are expensive and require an organisation that is committed to the significant investment that is required to gain a security return. Other offering based on repurposed PC or Network equipment can only be deployed in too sparse numbers because of their size and cost to yield real benefits. Mostly these are network sniffers bundled together with adhoc scripts which often results in a significant manual overhead in interpreting the output. DA-WIN is different because:
- The software it uses has been purposefully designed for the task, it has been designed with regulations such as PC-DSS and Government Standards (332/5) in mind ? by personnel that helped set the baseline.
- The hardware is custom assembled - it is compact, cost effective which allows for easy and trouble free volume deployment.
- Supports Attack detection, Flood detection, brute forcing detection and a myriad of rogue access point detection techniques.
The typical organisation will claw back its expenditure on manual wireless scanning within 18 months.
Download DAWIN
Go to link download
Tuesday, March 14, 2017
Android Phone Me Notification Status Bar Kaise Customize Kare
Android Phone Me Notification Status Bar Kaise Customize Kare
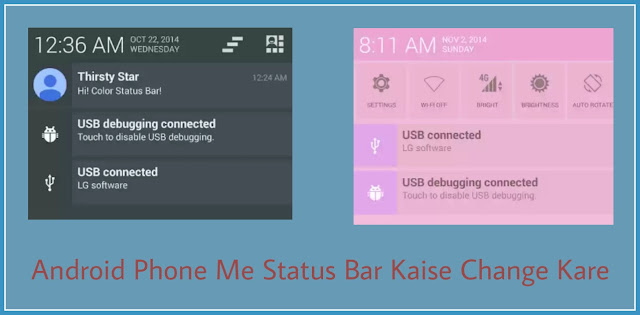
Friends, Android phone me jab ham finger se upar se neeche ki taraf drag karte hai to jo slide girti hai use status bar ya notification panel kehte hai.
Isme hame sabhi apps ki notifications show hoti hai aur kuch jaroori shortcut icons hote hai jaise - wi-fi, mobile data, bluetooth, sound, location etc. Yadi aapko apne phone ka notification panel pasand nahi hai to aap ise change kar sakte hai. Is post me ham aapko isi ki jankari dene wale hai.
Aapne bahut se launchers and themes use kiye honge but unse Notification panel customize nahi hota hai. But is trick se aap without rooted phone ka status bar bhi customize kar sakte hai, iske liye phone rooted hona jaroori nahi hai.
Android Phone Me Notification Panel / Status Bar Kaise Change Kare
Mai yaha 2 alag - alag methods bata bata raha hu. Dono methods me alag - alag application ka use kiya gaya hai. In dono methods me se koi ek ka use karna hoga. Aapko jo method acchi lage aap uska use kar sakte hai.
First Method -:
1. Play store se color status bar app install kare. Iski download link neeche di hui hai.
3. Enable color status bar option ke saamne diye hue checkbox me tap karke ise enable kare.
4. Jaise hi ise enable karenge to notification access setting open hogi. Isme bhi color status bar app ke saamne diye hue checkbox me tap kare notification access enable kare aur back karke app me wapas aaye.
5. Iske baad aap notification panel open karke dekhenge to payenge ki wo change ho chuka hai but usme default theme hai.
6. Yadi aapko theme change karna ho to app me oopar diye hue theme option me jaye aur apne pasand ki theme select kare.
7. Aapko apne hisaab se theme ke options and boxes ka color change karna hai to add your theme option me jaye aur jis jagah ka color change karna hai waha tap kare aur color choose karke apply kare aur oopar diye hue save option se use save karke set kare.
8. Setting option se bhi apne hisaab se settings kar sakte hai.
Download Color Status Bar
2. Install hone ke baad open kare.3. Enable color status bar option ke saamne diye hue checkbox me tap karke ise enable kare.
4. Jaise hi ise enable karenge to notification access setting open hogi. Isme bhi color status bar app ke saamne diye hue checkbox me tap kare notification access enable kare aur back karke app me wapas aaye.
5. Iske baad aap notification panel open karke dekhenge to payenge ki wo change ho chuka hai but usme default theme hai.
6. Yadi aapko theme change karna ho to app me oopar diye hue theme option me jaye aur apne pasand ki theme select kare.
7. Aapko apne hisaab se theme ke options and boxes ka color change karna hai to add your theme option me jaye aur jis jagah ka color change karna hai waha tap kare aur color choose karke apply kare aur oopar diye hue save option se use save karke set kare.
8. Setting option se bhi apne hisaab se settings kar sakte hai.
Second Method -:
1. Material status bar app install kare. Iski download link neeche di hui hai.
3. Sabse oopar right corner me diye hue switch me tap kare.
4. Ab aapko ek message show hoga usme diye hue accessibility option me click kare.
5. Ab accessibility setting open hogi waha par material status bar find kare aur uski accessibility off se on kare aur wapas app me jaye.
6. Iske baad aap apne phone ka notification panel open karenge to payenge ki wo change ho chuka hai.
7. Theme option me jakar aap doosri theme bhi select kar sakte hai.
Download Material Status Bar
2. Install hone ke baad open kare.3. Sabse oopar right corner me diye hue switch me tap kare.
4. Ab aapko ek message show hoga usme diye hue accessibility option me click kare.
5. Ab accessibility setting open hogi waha par material status bar find kare aur uski accessibility off se on kare aur wapas app me jaye.
6. Iske baad aap apne phone ka notification panel open karenge to payenge ki wo change ho chuka hai.
7. Theme option me jakar aap doosri theme bhi select kar sakte hai.
Friends aapko ye post kaisi lagi hame comment me bataye. Ye post apne friends ke sath share kare. Hamare blog ki new updates facebook me pane ke liye hamara facebook page like kare aur email me pane ke liye hamara blog subscribe kare.
Go to link download
Subscribe to:
Posts (Atom)