Showing posts with label facebook. Show all posts
Showing posts with label facebook. Show all posts
Sunday, April 30, 2017
Whatsapp Aapka Data Facebook Ke Sath Share Karega
Whatsapp Aapka Data Facebook Ke Sath Share Karega
Aapka log jaante honge ki whatsapp kitna popular social network hai. lagbhag sabhi android user whatsapp ka use karte hai. lekin aaj jo aap jaan ne waale hai use sunkar aap bhi jaroor pareshaan ho jayenge.
aapko bata den ki facebook ne whatsapp ko year - 2014 me khareed liya tha, lekin whatsapp ne users ki privacy ke liye kaha tha ki ham apne users ka data facebook ya other kisi site ke sath na hi share karega aur na hi bechega. lekin ab whatsapp apne waade se mukar raha hai aur whatsapp users ka data facebook ke sath share karne ki deal kar liya hai. whatsapp ke is decision se whatsapp users chinta me hai. wese whatsapp ne kaha hai ki isse users ko koi nuksaan nahi hoga balki isse user experience badhega kyoki iske dwara facebook aapke intrest ke hisaab se aapko ad dikhayega. ham is post me aapko detail se batayenge ki aapka kon kon sa data share kiya jayega, facebook aisa kyo kar raha hai aur ise kaise roka ja sakta hai. To chaliye dekhte hain -
Whatsapp Facebook Ke Sath Aapke Kis Data Ko Share Karega
Whatsapp aapka phone number aur personal data ko facebook ke sath share karega, users is se pareshaan hai lekin facebook ka kehna hai ki users ke personal data ke sath koi chhed chhaad nahi ki jayegi.
Whatsapp Users Ka Personal Data Facebook Ke Sath Share Kyo Kar Raha Hai
Aap log soch rahe honge ki aakhir whatsapp users ka personal data facebook ke saath share karne ka maksad kya hai ?
Aap log jaante hain ki whatsapp no ad policy par work karta hai, matlab aapko dusri kisi company ke ads whatsapp par show nahi hote aur whatsapp apni is policy ko barkaraar rakhna chahta hai.
Facebook ka kehna hai ki whatsapp users ke personal data ka use karke aapke intrest ka anadaza lagaya jayega aur us hisab se aapko ad dikhaye jayenge aur friend suggest kiye jayenge.
Shayad aap jante honge ki facebook ki kamai ka sabse bada hissa dusri company ke ad show karne se aata hai.
Whatsapp aur facebook ke is decision se whatsapp ki no ad policy bhi barkaraar rahegi aur facebook ki earning me bhi ijafa ho jayega.
Wese whatsapp ka kehna hai ki users ka personal data facebook ke alawa other kisi company ke sath share nahi kiya jayega aur naa hi users ke personal data ke sath koi chhed chhad ki jayegi balki is se user experience badhega.
Aapke Whatsapp Ka Personal Data Facebook Ke Sath Share Hone Se Kaise Roke
Yadi aap apne whatsapp ki privacy ko banaye rakhna chahte ho aur apna personal data facebook ke sath share nahi karne dena chahte ho to ise rok sakte ho.
Aapke paas whatsapp dwara ek message show hoga, screenshot me dekhen
Aapke paas whatsapp dwara ek message show hoga, screenshot me dekhen
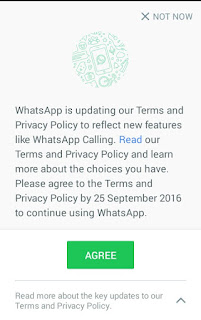
isme aapko Agree ki button show ho rahi hai lekin aap read option ko choose kare. iske baad aapko ek message show hoga share my whatsapp information with facebook , screenshot dekhen
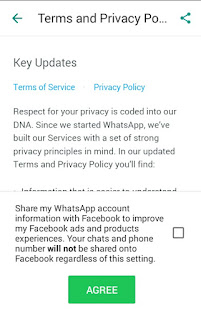
iske saamne jo box hai use uncheck karen aur agree button me click karen.
Yadi aapke saamne ye message pehle hi aa chuka hai aur aapne dhokhe se ya fir iski terms & policy bina read kiye Agree ki button daba diya hai to bhi aap ise band kar sakte hain.
whatsapp open kare aur option kholen > setting > account me jayen, ab aapko isme ek option show hoga share my account info use uncheck kar den.
Last Words
Whatsapp aur facebook dwara aisa isiliye kiya gaya hsi ki whatsapp ki no ad policy bhi barkaraar rahe aur facebook dwara aapke intrest ke hisab se aapko ad show kiye ja saken. is se aapko pareshaan hone ki jaroorat nahi hai kyoki whatsapp aur facebook aapki privacy ka poora dhyan rakhte hain aur fir whatsapp ne bhi kaha hai ki aapka data facebook ke alawa other kisi site ke sath na to share kiya jayega aur na hi becha jayega, fir bhi yadi aap apni privacy ko lekar pareshaan hain to hamare bataye hue tarike se ise band kar sakte hain.
Friends aapki is jaankari ko lekar kya raaye hai hame comment me batayen
Ye Bhi Padhen :
? Whatsapp me chats head kaise enable kare
? Whatsapp group ko bina leave kiye chat clear kaise kare
? whatsapp me color text kaise likhe
? Whatsapp ke fixedsys font ka use kare
? Whatsapp ke reply feature ka use kaise kare
? 1 phone me 2 whatsapp kaise chalaye
? 10 whatsapp tricks in hindi
? whatsapp me friend ki profile pic kaise change kare
Go to link download

How to write or comment in blue color text on Facebook
How to write or comment in blue color text on Facebook

In my previous posts I have mentioned you how you can use the Facebook Graph API to create some cool emoticons. If you have missed it then read it here: Special Facebook Secret Emoticons and Picture Smileys
Now let me show you how you can make your status update or comments as a link having the default Facebook blue color.
So how to you comment with blue color on Facebook?
Well its really simple. Just enter your message in a specific format.
1. Copy sentence which is below and replace the text “YOUR STATUS OR COMMENT” with the message you wish to post.
@@[3:[0:3:YOUR STATUS OR COMMENT]]
If the above code doesn’t work you can try this:
@@[2:[0:2:YOUR STATUS OR COMMENT]]
That’s it press enter and your status update or comment will be posted as link in blue color.
Go to link download
Saturday, April 29, 2017
Facebook Messenger Transparent Black Mod Apk
Facebook Messenger Transparent Black Mod Apk

Now keeping up with friends is too much fun.
FEATURES OF THIS APP
Black skin
Transparent Skin
Anti Ban
More Features to discover.
INSTALLATION PROCESS
Download the apks from below link.
Install normally and enjoy the new theme of facebook messenger.
#GREAT_MESSAGING
DOWNLOAD SECTION :-
Download - Facebook Black messenger
Go to link download
Monday, April 24, 2017
Facebook Me Aapko Kisne Unfriend Kiya Kaise Jane
Facebook Me Aapko Kisne Unfriend Kiya Kaise Jane

Kya aap jaanna chahte hai ki aapko facebook se kisne unfriend kiya hai aur kisne block kiya hai ? Yadi haa, to ye post aapke liye hi hai. Aaj ham aapko ek chhoti si but special trick batayenge jiski madad se aap ye sab aasani se jaan payenge.
Facebook aaj ke samay me kitni badi social media site ban gayi hsi ye baat to aap acche se jaante hai. Aaj kuch year pehle iska use jyada log nahi karte the but aajkal iska use lagbhag sabhi log karne lage hai to sabki fb par friend list bhi lambi rehti hai jiski wajah se hame pata nahi chal paata ki kisne hame unfriend and block kiya hai. But is trick se aapko aasani se pata chal jayega.
Facebook Me Aapko Kisne Unfriend Kiya Kaise Jane
Iska feature to facebook me available nahi hai but internet me moujood third party apps ki madad se ham aisa kar skata hai. Aajkal jo features official apps me nahi rehte wo features third party app me rehte hai. Jaise maine apni pichli post me GB Whatsapp ke features ke bare me bataya tha jo ki official whatsapp se kai guna jyada acche hai. Chaliye topic me aate hai, ham step by step jante hai.
1. Who deleted me on facebook app download kare. Ye playstore me bhi uplabdh hai ya aap neeche di hui link se bhi direct play store se ise install kar sakte hai.
Download
2. Download hone ke baad Login with facebook me click kare.
3. Username and password enter kare aur login kare.
4. Iske baad app ka successfully setup ho jayega. Iske baad upper left corner ki 3 verticle line ( Menu ) me click kare.
5. Menu me history category show hogi usme aapko perday ki alag alag notification show hogi.
( Note :-- Is app ka aap jab setup karenge uske baad ki hi notifications aapko show hongi. App ke setup ke pehle aapko kisne unfriend kiya hai ye show nahi hoga. )
Who Deleted Me On Facebook App Ke Features
Ye aapko unfriend ki notifications ke alawa aur bhi notifications deta hai. Chaliye jante hai.
1. Koi new friend banta hai to uski notification aayegi
2. Kis kis ne aapko unfriend kiya hai ye pata chalega.
3. Kisne aapko block kiya hai ye pata chal jayega.
4. Aapki friend list ke kis user ne apni id deactivate kiya hai ye bhi pata chal jayega.
5. Kisi ne apni deactivated id ko reactivate kiya to iski bhi notification aapko show hogi.
Friends aapko ye post kaisi lagi hame comment me bataye. Ye post apne friends ke sath bhi share kare. Is post se related koi question ho to aap hamse comment me pooch sakte hai. Hamari new posts ki free updates pane ke liye hamara blog subscribe kare.
Go to link download
HOW TO MAKE 100 300 MONTH USING FACEBOOK PAGE!!
HOW TO MAKE 100 300 MONTH USING FACEBOOK PAGE!!
Fan page is a nice way to earn money on Facebook. There are a lot of marketers who have popular Fan page where there have few millions of page likes, AND they are making more than $1000 every simgle day just promoting their own products, services, offers, affiliate products, cpa offers and etc. If you have a popular Fan page you can also make money like them. So first you need to create a Fan page, then post some valuable and informative content like article, videos, tutorials etc on it and share this posts to relevant groups and you can create paid campaign to boost your post, increase engagement such as likes, shares and comments. If you can post good contents to your Fan page and share it to relevant groups, you will see the rapid increment of likes of Fan page automatically day by day. But it works slowly, for faster result you must create paid campaign on Facebook. When you reach a certain amount of likes such as 10,000 or 20,000 likes, then you can promote your products, offers, services, cpa/affiliate products. And generally having 20,000 likes, you can earn $200-$300 per month, sometimes even more. And when you reach 1,00,000 likes of you Fan page, you can make over $1000 per month easily and automatically. So the more likes your page have, the more you can earn money from Facebook.

1) Sign up for viral9 by entering you Email address. Click here
2) After Successful sign up, check you email Inbox or Spam. You would have received a verification Email asking you to verify your Email.
3) After clicking on Verify My Email you will get a form as shown in Image Below.
4) After filling your “Personal Information” in step 3 above click Next. Now you need to enter “Traffic Information”.

- Mobile No: You 10 digit number e.g 8491xxxxxx
- Select Country: Select the country you are residing e.g India
- PIN Code: 6 digit PIN of your nearest Post Office
- In “Traffic Information” select the Social Network on which you will share Viral9 links e.g Facebook page, Twitter,etc.
- If you want to share Viral9 links on your Facebook page enter the page address in “Enter Page Source” box e.g https://www.facebook.com/ncellfreeinternet/
After filling all the details correctly. Check the Box saying “I have read and agree terms & condition”
Click on Submit and you are done with Viral9 Sign up. Now, Just sit back and wait for the Activation of your Viral9 Account. You will be notified with a confirmation Email. when You Sign Up Go to Campaigns And Earn more More Thanks.......
Go to link download
Sunday, April 23, 2017
Facebook messenger ki top 10 hidden tricks hindi me
Facebook messenger ki top 10 hidden tricks hindi me

Hello friends, me is post me aapko facebook messenger ki kuch hidden tricks batane wale hai, jo aapke kafi kaam me aa sakti hai.
facebook ke messenger app me bohot si hidden cheeze hai jo shayad hi aapko pata ho.
yadi me aapko sabhi tricks ke bare me batau to mujhe lagbhag 5000 words ki post likhna padega. isliye han aapko yaha kuch useful tricks hi batayenge.
facebook ke messenger app me bohot si hidden cheeze hai jo shayad hi aapko pata ho.
yadi me aapko sabhi tricks ke bare me batau to mujhe lagbhag 5000 words ki post likhna padega. isliye han aapko yaha kuch useful tricks hi batayenge.
Facebook messenger ki hidden tricks hindi me
1. Add Nickname
Messenger me ham kisi bhi friend ka apni suvidha ke liye nickname add kar sakte hai, kabhi - kabhi ek hi name ke 2-3 friends hote hai ya na bhi ho to bhi aap apni marji se apne manpasand name ko apne friend ka nickname bana sakte hai.
Messenger me nickname kaise add karte hai
Messenger app ko open kare aur jis friend ka nickname add karna hai uske saath conversation launch kare. conversation launch karne karne ke baad upar ki taraf right side me jo Thread detail ka option diya hai usme click kare. (screenshot dekhe)

thread detail option open karne ke baad aapko kuch options show honge unhi me nickname ka bhi option diya hai. nickname ke option me click kare aur aapko jo bhi nickname add karna hai use add karke save kar de.
nickname add karne ke baad aapko us friend ke orignal name ki jagah aapke dwara add kiya gaya nickname hi show hoga.
nickname add karne ke baad aapko us friend ke orignal name ki jagah aapke dwara add kiya gaya nickname hi show hoga.
2. Random Cute
Messenger me aap apne kisi friend ko bina image choose kare simple se messege ko type karke cute si pic send kar sakte hai.
Messenger me random cute pic kaise send kare
Jis friend ko pic send karna hai uske saath conversation launch kare aur messege box me type kare @dailycute aur send kare. messenger aapke liye khud hi ek cute pic send kar dega.
3. Change Conversation Color
Messenge ki conversation ka default color skyblue rehta hai but aap yadi kisi friend ke saath ki conversation ka color change karna chahe to kar sakte hai.
Messenger me conversation color change kaise karte hai
Jis friend ke saath ki conversation ka color change karna hai uske saath conversation launch kare aur thread detail ka option open kare. thread detail option karne baad kuch options diye hue hai unhi me color ka option diya hua hai. color option open kare aur jo bhi color rakhna hai conversation ka use choose karke save kar de.
4. Play Basketball
Messenger ne 13 jun 2016 ke updated version me basketball game add kiya hai. iske liye kisi bhi third party app ko install nahi karna hai. is game ke baare me detail se jaanne ke liye ye post padhe : Facebook messenger me basketball kaise khelte hai.
5. Play Soccer
Messenger ne 13 jun 2016 ke updated version me basketball ke sath soccer game bhi add kiya hai. iske liye bhi koi third party app install nahi karna hai. iske baare me detail se jankari ke liye ye post padhe : Facebook messenger me soccer kaise khelte hai.
6. Play Chess
Ye messenger ka hidden game hai jiske baare me messenger ne apne users ko kisi bhi prakar ki news, notification ya messege nahi diya hai. is game ko khelne ke liye bhi kisi third party app ki jaroorat nahi hai. is game ko khelne ke liye bas kuch simple si commands ka use karna hai. is game ke baare me detail se jankari ke liye ye post padhe : Facebook messenger me chess kaise khelte hai.
7. Voice and Video Call
Messenger me voice aur video call karne ka bhi option hai. jiski madad se aap apne fb friend ko voice aur video calling kar sakte hai but iske liye aap jisko call karenge uske paas bhi messenger hona chahiye.
Messenger me voice and video call kaise karte hai
jis friend ko voice call karna uske sath conversation launch kare aur oopar ki taraf right side me phone ke icon me click kare.
video calling karne ke liye phone ke icon ke side me hi camcorder ka icon hai usme click kare.
video calling karne ke liye phone ke icon ke side me hi camcorder ka icon hai usme click kare.
8. Group Messeges
Messenger me aap apne family members ya kuch friends ka group bana sakte hai aur group messeging kar sakte hai. group ko ek accha sa name bhi de sakte hai.
Facebook messenger me group kaise create karte hai
Messenger me group create karne ke liye kisi bhi friend ke sath conversation launch kare aur thread detail ke option me click kare. thread detail option open hone ke baad create group option me click kare. uske baad group ka name rakhe aur group me members add kare.
9. Share location
Messenger ham apni location apne fb friend ke sath share kar sakte hai.
Facebook messenger me location kaise share karte hai
Sabse pehle apne phone ki location on kare fir jis friend ko location share karna hai uske sath conversation launch kare aur neeche taraf kuch options diye hue hai jisme se ek option me three dots (...) bane hai usme click kare. option open hone ke baad location me click kare uske baad send me click kare.
10. Create Shortcut
Messenger me aap chahe to kisi bhi friends ki conversation ka homepage me shortcut bana sakte hai.
Facebook messenger me conversation ka shortcut kaise banate hai
Messenger open kare aur jis conversation ka shortcut banana hai usme long press kare. long press karne ke baad kuch options show honge unme se create shortcut ke option me click kare.
Friends ummeed hai inme se kuch tricks aapke kaam aayengi. esi aur bhi tricks pane ke liye hamara blog regular visit kare aur hamara fb page like kare.
Go to link download
Friday, April 21, 2017
Top 20 Interesting Facebook Tricks In Hindi
Top 20 Interesting Facebook Tricks In Hindi

Hello friends, me aapko is post me facebook ki top 20 interesting tricks bataunga. aap log to jaante hi honge ki facebook kitna bada social network hai. facebook ke monthly 1.70 billion se bhi jyada active users hai. facebook ka use lagbhag sabhi internet users karte hai, isi ko dekhte hue ham aapke liye 20 facebook shortcuts and tricks lekar aaye hai.
Top 20 Interesting Facebook Tricks In Hindi
1. Facebook Me Color Text Kaise Likhe
Facebook me color text kaise likhe post me mene already bataya hai ki aap color text kaise likh sakte hai. is trick ki madad se aap facebook ke messages, posts and comment ko colorfull kar sakte hai but ye trick only facebook ke official app and fb lite me bas work karti hai.
2. Facebook Me Kisi Bhi App & Games Notifications Aur Invitations Ko Band Kaise Kare
Aap dekhte honge ki aapke me daily candy crush, 3 patti etc. games aur apps ki requests ya notifications aati rehti hai, jis se pareshani hoti hai. but aap chahe to in notifications ko band kar sakte hai. in notifications ko band karne ke liye apni fb id kisi browser me login kare uske baad -
setting & privacy > Apps > Platform me jaye aur no me click kare aur setting save kare. iske baad aapke paas kisi bhi game ya app ki notification aana band ho jayegi.
setting & privacy > Apps > Platform me jaye aur no me click kare aur setting save kare. iske baad aapke paas kisi bhi game ya app ki notification aana band ho jayegi.
3. 1 Phone Me 2 Facebook App Kaise Chalaye
1 phone me 2 facebook kaise chalaye post me mene bataya hai ki yadi aap facebook ke official app ya fb lite ka use karte hai to aap unhe double kaise kar sakte hai. waise aap is trick ki madad se apne phone ke sabhi installed apps ko double kar sakte hai.
4. Facebook Ki Jo Post Aapko Pasand Na Ho Usko Fb Wall Se Hide Kaise Kare
Kabhi kabhi hamare fb wall par facebook ke ads ki post show hone lagti hai jisme bekaar content ho yaa fir koi fb friend hi aisi post daal deta hai jo hame pasand na ho to use aap apne wall se hide kar sakte hai. wall se jo bhi post hide karna hai us post ke neeche More ka option rehta hai use open kare aur hide post option choose karke setting save kar de.
5. Facebook Me Cover Photo Aur Profile Photo Ko Combine Kaise Kare
Aap chahe to apne facebook ki cover photo aur profile photo ko combine kar sakte hai, jis se kisi bhi person dekhkar lagega ki ye to 1 hi photo hai. facebook ki cover photo aur profile photo combine kaise kare post me maine is trick ke bare detail se bataya hai.
6. Facebook Messenger Me Chess, Basketball & Football Kaise Khelte Hai
Yadi aap facebook chalane ke liye messenger app ka use karte hai to aap usme chess, football & basketball game khel sakte hai. iske liye aapko koi third party app ki jaroorat nahi padegi kyoki ye features messenger me hi inbuilt hai but facebook ki taraf se iska koi notification ya news nahi mili, isiliye ye trick jyada logo ko maalum nahi hai.
ye 3no games ke baare me mai already alag - alag post kar chuka hu jinhe aap read karke in games ke bare me jaan sakte hai.
? Messenger me basketball kaise khelte hai.
? messenger me football kaise khele.
? messenger me chess kaise khelte hai.
ye 3no games ke baare me mai already alag - alag post kar chuka hu jinhe aap read karke in games ke bare me jaan sakte hai.
? Messenger me basketball kaise khelte hai.
? messenger me football kaise khele.
? messenger me chess kaise khelte hai.
7. Kisi Facebook Friend Ko Bina Unfriend Kare Uski Post Facebook Wall Par Show Hona Kaise Band Kare
Aapki friendlist me bohot se friends rehte hai jinme se kuchko aap jante hai aur kuch ko nahi jaante hai. kuch friends aisi posts share karte hai jo hame pasand nahi hoti but hamari majboori rehti hai ki ham unhe unfriend nahi kar sakte but aap chahe to kisi person ko bina unfriend kiye hi uski posts apne facebook wall par show hona band kar sakte hai. iske liye us friend ko aapko unfollow karna hoga.
Unfollow karne ke liye browser me fb open kare aur apni id se login karne ke baad us person ki profile open kare jise unfollow karna hai. profile open karne ke baad more option choose kare, uske baad unfollow option me click kare.
Unfollow karne ke liye browser me fb open kare aur apni id se login karne ke baad us person ki profile open kare jise unfollow karna hai. profile open karne ke baad more option choose kare, uske baad unfollow option me click kare.
8. Faecebook Post Me Ulte ( ???n ) Text Kaise Likhe
Is trick se aap post, comment and message me ulte text likh sakte hai aur apne friends ko surprise kar sakte hai.
Facebook me ulte text likhne ke liye Fliptext.org open kare aur message box me apna message type kare iske baad flip button me click kare, jaise hi aap flip button me click karnege to neeche diye hue box me aapke likhe hue text ulte show honge unhe copy kar le aur post, comment ya message jaha par bhi ye text likhna ho waha paste kare.
Facebook me ulte text likhne ke liye Fliptext.org open kare aur message box me apna message type kare iske baad flip button me click kare, jaise hi aap flip button me click karnege to neeche diye hue box me aapke likhe hue text ulte show honge unhe copy kar le aur post, comment ya message jaha par bhi ye text likhna ho waha paste kare.
9. Kisi Facebook Post Ko Baad Me Read Karne Ke Liye Save Kaise Kare
Kabhi kabhi hame facebook ki koi post pasand aa jati hai but facebook me har samay kai posts share hoti hai jis se ki aapki pasand ki wo post chhup jati hai aur yadi ham use dhoondhna chahe to bohot mehnat karni padti hai. isi problem ko dekhte hue facebook ne kisi bhi post ko save karne ka feature diya hai jis se ki aap us saved post ko baad me bhi read kar sake.
Post save karne ke liye jo post aapko pasand ho uske neeche diye hue more option me click kare aur save option choose karke continue kare.
Saved post dekhne ke liye facebook ke homepage me jaaye aur menu option open kare isme aapko ek saved name ka option show hoga use open kare. open karne ke baad aapke dwara save ki gayi sabhi post aapko waha show hongi.
10. Facebook Me Blank Status Update Kaise Kare
Facebook hame blank status update karne ki facility nahi deta aur na hi ham normally blank status update kar sakte hai but is simple si fb trick se aap aisa kar sakte hai. blank status upload karne ke liye @[0:0: ] is code ko status box me type kare aur post kar de, post karne ke baad aap dekhenge ki aapka status blank show ho raha hai.
11. Facebook Ki Kisi Post Me Comment Karne Ke Baad Uski Notification Band Kaise Kare
Aap ye baat acche se jante honge ki ham facebook ki kisi post me comment karte hai to uske baad us post me jitni bhi likes and comments aati hai unki hame notification aati hai jiski wajah se pareshan hokar ham jyadatar posts me ham ye sochkar comment nahi karte ki iski notifications se ham pareshaan ho jayenge but aap jis bhi post me comment karte hai uski notification aana kuch simple se steps ko follow karke band kar sakte hai.
( Note - Ye setting sirf desktop mode me hoti hai isliye yadi aap mobile user hai to aise browser me fb open kare jisme desktop mode ka option ho. )
Kisi post me comment karne ke baad uski notification band karne ke liye us post ke top right corner me menu scroll bar rehta hai use open kare aur turn off notifications for this post option choose kare. iske baad us post ki notification aapke paas aana band ho jayegi.12. Facebook Messenger Ki Notification / Chat Heads Kuch Samay Ke Liye Band Kaise Kare
Messenger ka ye feature accha rehta hai ki hame kisi bhi message ki notification turant mil jati hai aur ham koi bhi work karte hue messenge ke chat heads se direct fast reply bhi kar sakte hai but yadi ham apne phone par kuch other work kar rahe hote hai to ye hame baar baar pareshan karta hai lekin iska bhi solution hai. messenger hame option deta hai ki ham iski notification kuch samay ke liye band kar sakte hai.
Messenger ki notification band karne ke liye messenger open kare aur profile icon me click kare. iske baad Notifications & Sounds option me click kare uske baad upar ki taraf dekhe on & off ki button di hui hai, use off kare. jaise hi aap button ko off karenge to aapse time poocha jayega ki aap kitne samay tak ke liye notification band karna chahte hai. isme aap 15 minute se 24 hour tak ka time choose kar sakte hai. time select kare aur ok button me click kare. iske baad aapke paas messenger ke message aur notification utne samay tak ke liye aana band ho jayenge.
Messenger ki notification band karne ke liye messenger open kare aur profile icon me click kare. iske baad Notifications & Sounds option me click kare uske baad upar ki taraf dekhe on & off ki button di hui hai, use off kare. jaise hi aap button ko off karenge to aapse time poocha jayega ki aap kitne samay tak ke liye notification band karna chahte hai. isme aap 15 minute se 24 hour tak ka time choose kar sakte hai. time select kare aur ok button me click kare. iske baad aapke paas messenger ke message aur notification utne samay tak ke liye aana band ho jayenge.
13. Facebook Me Private Photo Album Kaise Banaye
Facebook me aap chahe to apna private photo album bana sakte hai jo kisi ko show na ho aur uski photos bhi kisi ko show na ho. is album me aap apni personal photos save karke rakh sakte hai.
Private album banane ke liye apni profile open kare, iske baad photos option choose kare, iske baad create new album me click kare, iske baad album ka name choose kare aur privacy me only me choose kare. iske baad is album me aap apni private photos upload kar sakte hai jo ki kisi ko bhi show nahi hongi.
Private album banane ke liye apni profile open kare, iske baad photos option choose kare, iske baad create new album me click kare, iske baad album ka name choose kare aur privacy me only me choose kare. iske baad is album me aap apni private photos upload kar sakte hai jo ki kisi ko bhi show nahi hongi.
14. Apni Facebook Profile Picture Ki Privacy Ke Liye Use Un-clickable Kaise Banaye
Facebook me per day kai millions log online rehte hai, jisme kuch bure log bhi hote hai, jinse aapki privacy ko khatra rehta hai. wo aapki profile photo ka galat use kar sakte hai.
Aap facebook me apni profile picture upload to karna chahte hai but aap nahi chahte ki koi use zoom kar ke dekh sake ya download kar sake to profile open kijiye aur photos option me click kijiye, Profile picture folder open kijye iske baad apni profile picture choose karke uski privacy only me kar dijiye.
Aap facebook me apni profile picture upload to karna chahte hai but aap nahi chahte ki koi use zoom kar ke dekh sake ya download kar sake to profile open kijiye aur photos option me click kijiye, Profile picture folder open kijye iske baad apni profile picture choose karke uski privacy only me kar dijiye.
15. Facebook Me Shared Photo Album Kaise Banaye
Shared photo album aisa album rehta hai jisme aapke select kiye hue friends bhi photo upload kar sakte hai. maan lo ki aap kahi picnic ya tour par gaye hai to ye album aapke kafi kaam aa sakta hai. isme album banate hue friends select karna hota hai, aap jis jis friends ko is album me photo share karne ka adhikar dena chahte hai unhe select kare.
Shared photo album banane ke liye profile open kare, iske baad photos me click kare, iske baad create new album me click kare, iske baad album ka name choose, discription likhe, privacy ko public choose kare, iske baad Add contributors option me click kare aur jin friends ko aap is aalbum me photos share karne ka adhikar dena chahte hai unhe select kare aur done me click kare, iske baad folder save kare.
Shared photo album banane ke liye profile open kare, iske baad photos me click kare, iske baad create new album me click kare, iske baad album ka name choose, discription likhe, privacy ko public choose kare, iske baad Add contributors option me click kare aur jin friends ko aap is aalbum me photos share karne ka adhikar dena chahte hai unhe select kare aur done me click kare, iske baad folder save kare.
16. Facebook Ke Ads Off Kaise Kare
Facebook ki earning ka sabse bada hissa advertisement hi hai, ye aapko tarah tarah ke ads show karta hai jo ki hamare kuch kaam ke bhi nahi hote aur inki wajah se hamara time ke sath sath data bhi waste hota hai. ye ads page loading speed ko bhi slow karte hai. to aap yadi inhe off karna chahte hai to simple se steps se band kar sakte hai.
Facebook ads off karne ke liye menu open kare uske baad ads option me click kare aur off kar de.
Facebook ads off karne ke liye menu open kare uske baad ads option me click kare aur off kar de.
17. Facebook Ka All Data Download Kaise Kare
Friends aapke facebook ka jitna bhi data hai wo id me koi problem hone par loss ho sakta hai isliye facebook ne data download karne ka feature diya hai jiski madad se aap apne fb data ko save rakh sakte hai. ye option desktop mode me aata hai isliye yadi aap mobile user hai to aise browser ka use kare jisme site desktop view me open kar sake.
Data download karne ke liye top right corner se menu open kare aur setting option me click kare. iske sabse neeche option diya hai Download a copy of your facebook data isme click kare. iske baad start archieve me click kare, iske baad password enter karne ka option aayega usme apna password enter kare aur start archieve me click kare. iske baad thodi der ki processing hogi aur kuch samay baad aapke facebook ke registered email id par fb ka ek mail aayega usme download link hogi, waha se apna data download kare. ye data zip file me hota hai isliye yadi aap android user hai to ise open karne ke liye es file explorer app ka use kar sakte hai, ye app aapko play store me aasani se mil jayega.
Data download karne ke liye top right corner se menu open kare aur setting option me click kare. iske sabse neeche option diya hai Download a copy of your facebook data isme click kare. iske baad start archieve me click kare, iske baad password enter karne ka option aayega usme apna password enter kare aur start archieve me click kare. iske baad thodi der ki processing hogi aur kuch samay baad aapke facebook ke registered email id par fb ka ek mail aayega usme download link hogi, waha se apna data download kare. ye data zip file me hota hai isliye yadi aap android user hai to ise open karne ke liye es file explorer app ka use kar sakte hai, ye app aapko play store me aasani se mil jayega.
18. Facebook Me Apna Nickname Ya Maiden Name Kaise Set Kare
Facebook me ham apna nickname bhi set kar sakte hai aur use apni profile me name ke sath show kar sakte hai. nickname ke alawa aap maidan name, married name, birth name, former name, fathers name aur apne name ki alternative spelling bhi set kar sakte hai jisse ki koi bhi person facebook me aapko aasani se find kar sake. aap chahe to hi ye name fb me sabko show hoga , nahi to aap iska use other people ki aasani ke liye kar sakte hai jisse ki aapko fb me aasani se find kar sake.
Nickname set karne ke liye profile open kare, fir about me click kare iske baad dekhe other option diya hai uske neeche add nickname or maidan name ka option diya hai usme click kare. iske baad choose kare ki aapko konsa name choose karna hai ex.- nicname, maidan name, former name etc. iske baad name type kare aur save kare.
Nickname set karne ke liye profile open kare, fir about me click kare iske baad dekhe other option diya hai uske neeche add nickname or maidan name ka option diya hai usme click kare. iske baad choose kare ki aapko konsa name choose karna hai ex.- nicname, maidan name, former name etc. iske baad name type kare aur save kare.
19. Apni Facebook Id Ek Baar Me Sabhi Jagah Se Log Out Kaise Kare
Yadi aap apne kisi friend ke pc ya mobile par, school, lab, brother ya kisi ke bhi phone par id log in chhod diye ho to sabhi jagah se ek baar me hi logout kar sakte hai. is feature se aap apne phone ko secure kar sakte hai.
Apni fb id sabhi jagah se logout karne ke liye setting & privacy me click kare, iske baad where youre logged in option me click kare, iske baad sabhi ko mark kare uske baad remove selected me click kare.
Apni fb id sabhi jagah se logout karne ke liye setting & privacy me click kare, iske baad where youre logged in option me click kare, iske baad sabhi ko mark kare uske baad remove selected me click kare.
20. Facebook Me Birthday Ki Notifications Ko Off Kaise Kare
Facebook ka ye feature accha hai ki kisi bhi facebook friend ka birthday hone par hame notification mil jati hai but aapke me yadi jyada friends hai to daily hi birthday ki notifications aati hongi jis se pareshani hoti hai, lekin yadi aap chahe to in notifications ko off kar sakte hai.
Birthday notification off karne ke liye setting & privacy me click kare, iske baad notifications option choose kare, iske baad birthday option choose kare aur fir get notification option ke saamne ka box uncheck kare.
Friends aapko facebook ki ye top 20 tricks kaisi lagi hame comment me bataye aur ye post apne friends ke saath bhi share kare.
Go to link download
Wednesday, April 19, 2017
Reproduce y sube tus videos al Facebook en vivo
Reproduce y sube tus videos al Facebook en vivo

Google Play ID: com.gourmet.mallorca
Version: 1.1
Size: 7.3Mb
Gourmet Mallorca Screen Preview


Gourmet Mallorca Description
Gourmet Mallorca is a free mobile application for gourmets lovers for the island of Mallorca. A guide created for locals and tourists, divided into 8 different categories of food. Each restaurant is easily identifiable thanks to the tracking system and the interactive map. In the confusion and multitude of lists of locals on the island, we created a simple and intuitive guide. Gourmet Mallorca give you the possibility to: * Get offers and promotions of restaurants listed in Gourmet Mallorca; * Share restaurants present in the App into your social networks; * Write a comment about the experience of the individual Gourmet Restaurant; * See the Gourmet Mallorca Blog, where we insert new restaurants, recipes and news; * Enter in the community of Gourmet Mallorca and meet other Gourmets; * Found restaurantsof the following categories: Luxury, Pizza, Burgers, Sushi, Chinese, Spanish, Italian, Mexican, Indian, Sweets, Beach Bar, Cocktails, Delivery, shops and others. Are you a Gourmet?Whats new in Gourmet Mallorca 1.1
New Sections addedDownload Gourmet Mallorca 1.1 APK
Go to link download
Sunday, April 16, 2017
Facebook messenger me chess kaise khelte hai bina kisi third party app ke
Facebook messenger me chess kaise khelte hai bina kisi third party app ke

Friends aap log to jante hi hai ki Facebook messenger media and text message send karne ka kitna accha way hai. lekin kya aapko pata hai Facebook messenger me chess kaise khelte hai? nahi na. kyoki ye facebook messenger ka hidden game hai, jiska na to facebook ne koi promotion kiya hai na hi hame koi hint di hai. Ham is hidden game ko kuch commands ke dwara aasani se apne fb friends ke saath khel sakte hai. is game ke liye hame kisi third party app ki jaroorat nahi hai.
Facebook ki is secret trick ke bare me jyada kisi ko jankari nahi hai. lekin is post me aapko detail se is baare me bataya jayega. jis se aap aasani se apne fb friends ke saath online chess ka lutf uthayenge wo bhi sirf simple si commands ke dwara. aaiye dekhte hai.
* Facebook me sabhi friend requests ek click me accept kaise kare
Facebook messenger me chess kaise khelte hai
jaisa mene aapko bataya iske liye kisi third party app ki jaroorat nahi hai. sirf kuch simple si commands ke dwara aap chess khel sakte hai.
1. Messenger open kare aur jis friend ke saath chess khelna hai uske sath conversation open kare.
2. Conversation panel open hone ke baad aap messege box me @fbchess play type kare aur send kar de.
3. Jaise hi aap command send karenge conversation me chess board open ho jayega.

Chess board ke just upar aapko ek messege show hoga jisme aapko bataya jayega ki kisko konsa color diya gaya hai aur kiski move hai. aapko moves simple si commands ke dwara chalna hai.
jaise aapko pawn (pyada) chalna hai.
To mene image me jaise "b4" tile (khand)" ka example diya hai wese hi aap aasani se har tile ka name nikal sakte hai. Aur pawn(pyada) ka pehla word hai "p" to hame pawn ko b4 tile me chalne ke liye command send karna hai. @fbchess Pb4 .
ese hi yadi aapko "Queen" e7 tile me chalna hai to command send karenge @fbchess Qe7 .
Yadi aapko facebook chess se related help chahiye to aapko command send karna hai @fbchess help . jaise hi aap send karenge aapko conversation me ek messege show hoga jisme sabhi commands di hui hai.
* Facebook autoliker se hone wale nuksan
Facebook messenger me chess khelne ke fayde
1. Aapko kisi third party application ki jaroorat nahi hai. aap sirf messenger ki madad se hi chess khel sakte hai.
2. Online kisi bhi friend ke saath khel sakte hai.
3. Game khelte hue aap chating bhi kar sakte hai aur jaise hi move chalenge game wahi se start ho jayega jaha aapne chhoda tha.
4. Chess khelne ke liye har cheej ke liye sirf simple si commands ki jaroorat hai.
Friends aapko ye fb trick acchi lagi ho to apne friends ko bhi share kare aur hamara fb page like kare.
R
Go to link download
Facebook apk transparent apk
Facebook apk transparent apk

MODDED FACEBOOK V7
Facebook is an online social networking service headquartered in Menlo Park, California. Its name comes from a colloquialism for the directory given to students at some American universities. Facebook was founded on February 4, 2004, by Mark Zuckerberg with his college roommates and fellow Harvard University students Eduardo Saverin, Andrew McCollum, Dustin Moskovitz andChris Hughes. The founders had initially limited the website’s membership to Harvard students, but later expanded it to colleges in the Boston area, the Ivy League, and Stanford University. It gradually added support for students at various other universities and later to their high-school students. Facebook now allows anyone who claims to be at least 13 years old worldwide to become a registered user of the website, although proof is not required.
Facebook is an online social networking service headquartered in Menlo Park, California. Its name comes from a colloquialism for the directory given to students at some American universities. Facebook was founded on February 4, 2004, by Mark Zuckerberg with his college roommates and fellow Harvard University students Eduardo Saverin, Andrew McCollum, Dustin Moskovitz andChris Hughes. The founders had initially limited the website’s membership to Harvard students, but later expanded it to colleges in the Boston area, the Ivy League, and Stanford University. It gradually added support for students at various other universities and later to their high-school students. Facebook now allows anyone who claims to be at least 13 years old worldwide to become a registered user of the website, although proof is not required.
Key Features of this MOD
- Transparent Background
- Custom Black Colour Given in app
- Faster and Less Data Consumption compared to Original App
- No need to Update from PlayStore
- Clean and Easy to use
- Can Add your own Pic at the Background
- Can be used in Low Devices Having GingerBread (2.3)
- Usage Size Minimized as compared to Original FB app
Whats New
- 3d Notification Panel
- Dual Glass Screen Added
- Click Sound Added in Inbox
- Can Post Pics too in comments
- Installation Problem in some Devices SOLVED..,
- No need to update …until i post
- Data usage Decreases compared to PlayStore app
How to install it?
- Download Facebook from Given Link ( uninstall if already installed)
- Open the apk file & simply Install like other App
- Done… Enjoy your Faster & Different from Others Facebook


Direct Download (19MB)
Go to link download
HOW TO HACK FACEBOOK ACCOUNT PASSWORD USING BRUTE FORCE ATTACK
HOW TO HACK FACEBOOK ACCOUNT PASSWORD USING BRUTE FORCE ATTACK
Facebook Account hacking is not easy, but Tricks world provides you new and latest tricks to hack facebook accounts from android or from PC. i think you all read my previous articles on facebook hacking and according to team tekgyd they all are still working.

This (Facebook Hacking) is Only for Educational Purpose, Strictly Prohibited to use in wrong way
What Is Brute Force Attack?
Brute Force Attack is also known as Brute force cracking .It a a common trail & error method used by application programs to decode encrypted data such as Passwords, databases or other loop holes securities. This is a general definition of Brute force by google or other bloggers.
So, First lets know something about Brute force attacks, “A brute force attack is a trial-and-error method used to obtain information such as a user password or personal identification number (PIN).
In a brute force attack, automated software is used to generate a large number of consecutive guesses as to the value of the desired data.”
But, In our case I’ll be using a Python script and a Long Dictionary Of passwords. I have personally tried it on myself and it really works .
Also Read: Facebook phishing with undetectable profile
Requirement:
1. A Kali Machine / Or Any Python Engine Will work!
2. Facebook.py Download
3. A FaceBook id Of course
4. CrackStation Word List! Download from here
Now, Lets Start The Work
step 1. Install Python-mechanize using command mention below
[*] root@root:~#apt-get install python-mechanize
step 2. Add facebook.py using the command below
[*] root@root~# chmod +x facebook.py [*] root@root:~# python facebook.py
step 3. Now enter | Email | or | Phone number | or | Profile ID number| or | Username | of the victim,
step 4 . Now Give The "Path" Of Your CrackStation Word list
step 5. Now it will try all passwords present in the word list, So relax and have a cup of
coffee because it will take time depending on speed of your processor and password strength of your victim!
Go to link download
Saturday, April 15, 2017
How to Make colourfull Name id on Facebook
How to Make colourfull Name id on Facebook
Hello friends ,Thanks for visiting us today ill teach you how to make colorful id on Facebook.
steps:


6. now enter your password and save it.

steps:
1. download fly vpn from HERE
2. Now open fly vpn and click on server.
3. click on free
4. select spain server and connect spain
5. now open your fb account and go to setting and edit name copy following name.
first name => A?m?m?i
last name => S?i?n?g?h
keep visiting us
Go to link download
Thursday, April 13, 2017
Facebook messenger me basketball kaise khelte hai
Facebook messenger me basketball kaise khelte hai

Hindi Helpz me aapka swagat hai, Ham is post me janenge facebook messenger me basketball game kaise khelte hai. iske pehle ki posts me hamne facebook messenger ke Chess aur Soccer game ke baare me jana tha. Facebook world ki sabse badi social media site hai, iski alexa rank- 2 hai. matlab google ke baad facebook ka hi number aata hai. ye dino din aur bhi popular hote ja raha hai kyoki fb apne users ko poore tarike se satisfied karne ke liye bohot se new features add karte ja raha hai.
Facebook ne messenger me abhi haal hi me 13 jun 2016 ko aaye updated version 75.0.0.21.70 me Basketball aur Soccer game ka feature add kiya hai, jisme se soccer game ke baare me hamne pichli post me jaan liya hai. is post me ham messenger ke basketball game ke baare me janenge.
Facebook messenger me basketball game kaise khelte hai
1. Messenger open kare aur apne kisi fb friend ke saath conversation launch kare.

2. Emoji ke option me click kare
3. 5th number ke football emoji wale section me jaye.
4. Basketball emoji select kare aur send kar de.

5. Send ki hui basketball ki emoji me click kare.

Jaise hi aap emoji me click karenge ek window open hogi jisme neeche ball hai aur oopar goal. is game ko khelne ki liye aapko ball me touch kar goal ki taraf swipe karna hai aur goal me ball pass karna hai. aap regular jitni bhi baar ball pass karenge aapke utne score bante jayenge aur jaise hi ball neeche giri game over ho jayega.
Also read :
? Facebook me color text kaise likhte hai.
? Fb autoliker se nuksan
? Facebook me color text kaise likhte hai.
? Fb autoliker se nuksan
? Facebook ki sabhi friend requests ek click me kaise accept kare.
10 score ke andar aap jitni bhi baar goal pass karenge ball left - right hote rahegi aur 10 score ke baad goal left to right aur right to left hone lagega.
jaise hi game over hota hai aapka scoreboard aapke friend ko conversation me show hone lagega aur aapke friend ka score board aapko. dono me se jiske score jyada score honge uske score game ke upper left corner me show honge.
Facebook messenger ke soccer game ke features
1. Is game ke liye kisi third party application ki jaroorat nahi hai.
2. Ise offline mode me khel sakte hai.
3. group me bhi khel sakte hai.
Friends ye game to mujhe bohot pasand hai, aap bhi try kare aur hame comment me bataye aapko kaisa laga.
ye post aapko acchi lagi ho to hamara Fb page like karna na bhoole.
ye post aapko acchi lagi ho to hamara Fb page like karna na bhoole.
Go to link download
Sunday, April 9, 2017
How to Create a Long Name or Song Name id on Facebook
How to Create a Long Name or Song Name id on Facebook
Hello Readers warm Welocome to all, Today I am going to give you the best and wanted trick of 2016/2017.
Here I am going to show you how to create a Long or Song Name id on Facebook.

Requirements:
- TunnelBear App (available on playstore or you can download it from Here) or fly vpn from HeRe
- Android Phone
Steps:
1. First of all Download and install TunnelBear app from playstore or from above link.
Also read : INAPP PURCHASE FOR PLAYSTORES APP AND GAMES
Also read : INAPP PURCHASE FOR PLAYSTORES APP AND GAMES
2. Now Set the country to JAPAN and then click on CONNECT
3. Now come back to Facebook and go to Name change settings.
4. Before writing anything you have to place a Japanese Symbol( ? )
Also paste this after Completing your name
5. Now type the song which you want to.
example:
First Name: ?BHEEGI()BHEEGI()SADKON()PEIN()MEIN()TERA()INTEZAAR()KARU()
Last Name:HAULE()HAULE()ZINDAGI()AB()TERE()HI()NAAM()KARU ?
Note : Between each and every word there should be "Japanese Space"
If you use normal space from your keyboard it willnot work
() [open and close bracket is called Japanese space]
Also read: Worldwide Free Unlimited Calling Trick From Internet

6.Now Review change and Done!
Yes,This is the simplest trick to change your Facebook id to long name id!
Keep Visiting us !
Go to link download
Saturday, April 8, 2017
Ab Facebook Ke Jariye Milega 100000 Rs Tak Ka Loan
Ab Facebook Ke Jariye Milega 100000 Rs Tak Ka Loan

Dosto, kya aapko pata hai ki ab facebook me aapka account hai to aapko 1,00,000 rs. tak ka loan mil sakta hai. aap soch rahe honge ki ye majak hai, lekin ye bilkul sach hai ki yadi aapka facebook me account hai to aap iske jariye 1 lakh rupay tak ka loan le sakte hai.
iski sabse acchi baat ye hai iske liye aapko kisi bhi prakar ka paperwork nahi karna padega aur loan aapko sirf 24 hours ke andar mil jayega.
iski sabse acchi baat ye hai iske liye aapko kisi bhi prakar ka paperwork nahi karna padega aur loan aapko sirf 24 hours ke andar mil jayega.
Pune ki ek company ne early salary name ka ek android app banaya hai jiske ceo akshay mehrotra hai. ham is post me janenge ki iska lakshya kya hai, loan kaise milega, kitne samay me milega, kon kon le sakta hai, loan lene ke liye kya kya lagega aur ye suvidha kaha kaha par uplabdh hai.
Early Salary App Ka Kya Maksad Hai Aur Ye Kyo Banaya Gaya
Akshay mehrotra ji batate hai aaj kal adhiktar youngsters ki salary kam hoti hai aur jaroorte tarah tarah ki hoti hai to salary month ke end tak bhi nahi chal paati. lekin is app ki madad se aap chahe jaha par bhi ho is app se aapko loan ke liye apply karna hai aur 24 hours tak aapko loan mil jayega.
Read Also :
? Facebook messenger ki top 10 tricks.
? Facebook me color text kaise likhte hai.
? Facebook autoliker se hone wale nuksan.
? 1 Android phone me 2 facebook app chalaye.
Loan Ke Liye Kya Kya Lagega
Sabse pehli baat to ye loan facebook id ke throw milega to iske aapka facebook account hona chahiye, monthly income 20,000 rs. hona chahiye, PAN card, 3 month ka bank statement, linkedin account aur aapke paas android phone bhi hona chahiye kyoke early salary ek android application hai.
Early Salary App Se Loan Kaise Milega
Sabse pehle aapko play store se early salary app download karna hai uske baad aapko usme apni sabhi jankari sahi sahi fill karna hai jaise- PAN nu., bank acc. ka 3 month ka statement, bank account number, facebook login, linkedin id etc.
Is app se 10,000 rs. se 1,00,000 rs. tak ka loan le sakte hai jo ki aapko 2.5 % interest rate per month ke hisab se 7 days se 30 days ke andar chukana padega.
Aap jaise hi is app se loan ke liye apply karenge aapke phone me 10 minute ke andar loan approval alert aayegi aur 24 hours ke andar jitne rs. loan ke liye aapne apply kiya tha wo aapke bank account me aa jayega.
Ye aapke facebook account aur linkedin account ki activity check karti hai ki aapka friend circle kaisa hai aur aap kitne time tak active rehte hai etc. aapki activity jitni acchi hogi, loan utni hi jaldi aur kam interest rate par milega.
Early Salary App Ki Suvidha Kaha Kaha Par Uplabdh Hai
Ye suvidha sabse pehle pune me start ki gayi thi lekin present me mumbai, gurugram, delhi, noida, bangalore aur chennai me uplabdh hai. Jald hi yah suvidha desh ki labhag sabhi city me uplabdh hogi.
Early salary ke ceo akshay malhotra ka kehna hai ki is company ka target next year tak 300 crore rs. loan dene ka target hai.
Jin cities me ye suvidha uplabdh hai yadi aap bhi waha se talluk rakhte hai to jaroorat padne par iska fayda jaroor le.
Friends aapko ye jankari lagi hame comment me bataye. hamari website aur bhi articles hai unhe bhi read kare. esi hi aur bhi jankari facebook par pane ke liye hamara facebook page like kare.
Go to link download
Friday, April 7, 2017
Unlimited Facebook Accounts Kaise Banaye Fake Emails Ki Madad Se
Unlimited Facebook Accounts Kaise Banaye Fake Emails Ki Madad Se

Hello friends, is post me aapko bataunga ki aap fake emails ki madad se unlimited facebook accounts kaise bana sakte hai. Ye trick 100% worked hai aur isme aapko jyada time bhi waste nahi karna padega. Poori process me jyada se jyada 5 minute lagega.
Aap log jante hi honge ki ek email/mobile number se ek hi facebook account banta hai aur email account banane ke liye bhi mobile number ki jaroorat padti hai aur ek mobile number se ek hi email account banta hai. Inhi problems ki wajah se ham ek, do se jyada facebook accounts nahi bana pate but is trick ki madad se aap jitne chahe utne facebook accounts bana sakte hai.
Fake Emails Ki Madad Se Unlimited Facebook Accounts Kaise Banaye
1. www.facebook.com open kare aur create new account button me click kare.

2. Name, surname, date of birth, gender and password fill kare aur phone number and email address box ko blank chhod den.
3. Ab is step me aapko fake email banakar use facebook se confirm karna hai. Iske liye sabse pehle apne browser me doosra tab open kare aur http://temp-mail.org/option/change is link ko open kare.

4. Isme diye gaye login box me apne pasand ka username fill kare aur save button me click kare.

5. Iske baad jo page open hoga usme ooper hi aapko aapka email aapke pasand ke username ke saath show hoga, use copy kar le.

6. Ab apne browser dobara first tab facebook sign up wala open kare aur phone number or email address wale box me copy kiye hue email ko paste kar den aur sign up button me click kare.
7. Ab aage ke steps jaise profile picture, mobile number, add friend etc. steps ko skip kare.

8. Last me aapko email verify karne ke liye confirmation code enter karne ke liye kaha jayega.

9. Browser me 2nd tab fake email wale page ko dobara open kare aur refresh button me click kare.

10. Page refresh hone ke baad facebook ka mail show hoga use open kare.

11. Usme diye hue confirmation code copy kare aur facebook sign up wale 1st tab ko open kare.

12. Enter confirmatiin code wale box me copy kiye hue code ko paste kare aur confirm button me click kare.
Done...
Is trick ki madad se aap jitne chahe email accounts and fb accounts bana sakte hai.
Note : Ye post sirf knowledge purpose ke liye hai. Iska galat use na kare. Yadi aap is trick ka use kisi illigal purpose ke liye karte hai to iske jimmedar mai ya hindihelpz.com nahi hoga, iske jimmedar aap khud honge.
Friends aapko ye post kaisi lagi hame comment me bataye aur aapko is post se related koi problem ho to bhi comment me pooch sakte hai. Ye post apne friends ke sath share kare. Hamare blog ki new updates facebook me pane ke liye hamara facebook page like kare aur email me pane ke liye hamara blog subscribe kare.
Go to link download
Subscribe to:
Posts (Atom)