Showing posts with label without. Show all posts
Showing posts with label without. Show all posts
Sunday, April 30, 2017
Z3x Samsung Tool Pro 24 4 Full Cracked Working Without Box 1000 Tested Free Download
Z3x Samsung Tool Pro 24 4 Full Cracked Working Without Box 1000 Tested Free Download

Z3x Samsung Tool Pro 24.4 Full Cracked Working Without Box 1000% Tested Free Download
Z3X Samsung Tool Pro 24.4 Crack Setup Full Free Download No Pasword
Latest Crack Z3X Samsung Tool Pro 24.4 Crack Software Run Without Box No Password
Z3X 24.4 Crack Samsung Tool Pro Free Download No HWID Without Password
Latest Z3X box Crack Samsung Tool Pro 24.4 Only Loader NO HWID Free Download
Z3x Samsung Tool Pro 24.4
Latest Crack Update 2016
___________________________________________
No Need Box, No Need Credit
No Need Any Hwid, NO Need Registration
_____________________________________________
Full Free Without password
1000% Working Crack Loader
-------------------------
Virus Free So No Tension
How to Setup Crack
> Extract Z3x 24.4 Crack Zip Achive
> Open/Run as Administrator Copie de gsm-magic
> Extract Z3x 24.4 Crack Zip Achive
> Open/Run as Administrator Copie de gsm-magic
> Click Enable
> Now Open/Run As Administrator Z3x 24.4 Loader
> Click Start Loader .......wait sometime
> Enjoy Full Z3x Samsung Tool Pro 24.4 Free
_______________________
Download Z3x Samsung Tool Pro 24.4 Crack Here
Link#1
Link#1
Download
Link#2
Download
Go to link download

Friday, April 28, 2017
Unlocking pattern or password on Android device without losing data
Unlocking pattern or password on Android device without losing data
Steps On Bypassing or Unlocking Pattern Lock or Password on Android Devices Without Losing Data:
Now, before you take any action on your device, make sure you know it well and understand it, if you have a question,
kindly use the comment box and I will reply as soon as I receive the comment.
Requirement For a Successfully Operation
1. Aroma File Manager 1.80 which you can download Here
2. Your Locked android device either locked by pattern lock or password
3. A Memory card( the memory card of the android device)
You will be surprised that we don’t need a computer, that the awesome thing about this method of unlocking password and pattern locks.
To the main business proper, how to unlock the pattern lock or password, please follow the steps
Step 1
Once you have download the Aroma file manager, move it to the memory card and insert the memory card to the android device
Step 2
Open your stock recovery and different device has there own way of entering stock recovery, so I advise you Google it out along with your android device name. Once
you have it, enter into stock recovery which is a black interface
Step 3
once you are there, use your volume + and volume – to scroll up and down and use the middle button to select
Step 4
Now Mount and storage>> Mount Everything>> Mount
System>> Mount data>>Mount afs>>Mount
Preload>>Mount SDcard>> Mount ExternalSD>> go
back>> Install zip from SDcard>>Choose zip from external
SDcard
Step 5
The find the Aroma File manager you download into the sdcard and select and select “Yes Install Aroma file manager” then it will load and the file manager will open in the recovery mode
Step 6
In the aroma file manager, go to Settings and Go to bottom n select “Automount all device on start ” which is the second to last option and then exit from aroma file
manger.
Step 7
perform step 5 again and the Aroma file manager will update and open again
Step 8
go to the Data Folder>>>then System folder and find the gesture.key if it is password lock that locked your phone or password.key if it was a password lock and press the file for long and the option to delete the file will pop up and delete it
Step 9
Exit the aroma file manager and restart to the normal interface and when the device has finished restart you will still find the pattern lock or password there but you are to use any pattern lock or password and it will accept and your device is unlocked but note the pattern you use and password.
Note: This is only for Educational purpose. Hacking is an illegal activity, we are not responsible for any harm happened to you by hacking.
Now, before you take any action on your device, make sure you know it well and understand it, if you have a question,
kindly use the comment box and I will reply as soon as I receive the comment.
Requirement For a Successfully Operation
1. Aroma File Manager 1.80 which you can download Here
2. Your Locked android device either locked by pattern lock or password
3. A Memory card( the memory card of the android device)
You will be surprised that we don’t need a computer, that the awesome thing about this method of unlocking password and pattern locks.
To the main business proper, how to unlock the pattern lock or password, please follow the steps
Step 1
Once you have download the Aroma file manager, move it to the memory card and insert the memory card to the android device
Step 2
Open your stock recovery and different device has there own way of entering stock recovery, so I advise you Google it out along with your android device name. Once
you have it, enter into stock recovery which is a black interface
Step 3
once you are there, use your volume + and volume – to scroll up and down and use the middle button to select
Step 4
Now Mount and storage>> Mount Everything>> Mount
System>> Mount data>>Mount afs>>Mount
Preload>>Mount SDcard>> Mount ExternalSD>> go
back>> Install zip from SDcard>>Choose zip from external
SDcard
Step 5
The find the Aroma File manager you download into the sdcard and select and select “Yes Install Aroma file manager” then it will load and the file manager will open in the recovery mode
Step 6
In the aroma file manager, go to Settings and Go to bottom n select “Automount all device on start ” which is the second to last option and then exit from aroma file
manger.
Step 7
perform step 5 again and the Aroma file manager will update and open again
Step 8
go to the Data Folder>>>then System folder and find the gesture.key if it is password lock that locked your phone or password.key if it was a password lock and press the file for long and the option to delete the file will pop up and delete it
Step 9
Exit the aroma file manager and restart to the normal interface and when the device has finished restart you will still find the pattern lock or password there but you are to use any pattern lock or password and it will accept and your device is unlocked but note the pattern you use and password.
Note: This is only for Educational purpose. Hacking is an illegal activity, we are not responsible for any harm happened to you by hacking.
Go to link download
Tuesday, April 25, 2017
Adguard Premium v2 9 1 Beta Block Ads Without Root Cracked APK
Adguard Premium v2 9 1 Beta Block Ads Without Root Cracked APK

Adguard Premium
Adguard provides you with a reliable and manageable protection that immediately and without your participation filters the loading web pages. Adguard removes all the annoying ads, blocks loading of dangerous websites, and will not allow anyone to track your activities on the Internet.
Adguard uses local VPN technology to filter traffic without ROOT privileges. This means that VPN server is embedded right in your device so there is no need in additional remote connections. After running the app, it immediately starts to filter all your Internet bandwidth quietly and quickly.
When processing a web page, Adguard does several things at once:
- Removes ads and online tracking code directly from the page.
- Checks a page against our database of phishing and malicious sites.
- Checks apps downloaded from unknown sources.
How to Install?
- Download and install apk file as usual
- Done and Enjoy!

Screenshots

Go to link download
Sunday, April 9, 2017
HOW TO DOWNLOAD YOUTUBE VIDEOS ON ANDROID EASILY WITHOUT SOFTWARE
HOW TO DOWNLOAD YOUTUBE VIDEOS ON ANDROID EASILY WITHOUT SOFTWARE
HOW TO DOWNLOAD YOUTUBE
VIDEOS ON ANDROID EASILY WITHOUT SOFTWARE:
1. Download OPERA MINI CLASSIC
from Play Store
2. After download open OPERA
MINI
CLASSIC and put url in m.youtube.com
3. And search song into search box
4. After Video search goto Setting>>
Advance>>User Agent>>PC[remove
Mobile option]
5. Then back into ur video and refresh the page
6. Open into video on MX Player
or Video Player
7. Done
VIDEOS ON ANDROID EASILY WITHOUT SOFTWARE:
1. Download OPERA MINI CLASSIC
from Play Store
2. After download open OPERA
MINI
CLASSIC and put url in m.youtube.com
3. And search song into search box
4. After Video search goto Setting>>
Advance>>User Agent>>PC[remove
Mobile option]
5. Then back into ur video and refresh the page
6. Open into video on MX Player
or Video Player
7. Done
Go to link download
Wednesday, April 5, 2017
How To Bypass Android Pattern Lock Without Losing The Data
How To Bypass Android Pattern Lock Without Losing The Data
All of us using Smartphones today mostly have a lock device on our devices. This lock system is basically to protect our personal data from getting leaked or visible to other people. Also, in a case where your phone is stolen or lost, locks always help in protecting your phones.
Now with the constant usage of phones and other accounts where passwords are needed, we at times forget the password that we have applied to lock our phones. This thing has become very common lately. In a hurry, when we want to open our phones, we forget the lock we have set.
Well, now there is nothing to worry about. Here, I have explained few techniques especially for android users by which they can unlock their phones easily even if they have forgotten their lock.
Follow the below given steps to bypass android pattern lock without losing data:
Requirements:-
- Android SDK tool For PC- Download From Here
- Android phone with USB Debugging enabled
- Data Cable
How To Enable USB Debugging On Your Android Device
- Go to the Settings of the Phone
- Then About Phone
- Tap On Build Number 7 Times
- Now a pop up will appear “You Have Now Become A Developer”
- Then again go to settings
- There you will see “Developer Option”
- Open it and check “USB Debugging”
How To Bypass Android Pattern Lock
1. Connect your android device to PC/Laptop.
2. Now open the folder where you installed “ Android SDK Tool “.
3. Generally it is available here In Your PC –
Users>>App Data>>Local>>Android>>Android SDK>>Platform Tools4. Enable “ Show Hidden Files And Folder ” In your PC as the folder is hidden.
5. Now right click on “ Platform Tools ” Folder and select “ Open Command Window Here “.

6. Now enter this command:
adb shell
cd /data/data/com.android.providers.settings/databases
sqlite3 settings.db
update system set value=0 where name=’lock_pattern_autolock’;
update system set value=0 where name=’lockscreen.lockedoutpermanently’;
.quit
If above command is not working then put:
adb shell rm /data/system/gesture.key
7. Reboot your phone and you will see that your pattern lock is removed.
NOTE: USB Debugging must be enabled before the pattern lock. If it is not then this whole process will not work.
When you reboot the device, you would see a pattern lock which gets disabled. So, in this way, you can easily bypass android pattern lock, password or pin without losing data or formatting the device. If you have any problem regarding this, comment below.
Go to link download
Sunday, April 2, 2017
How to make free call without sim card use Red international number
How to make free call without sim card use Red international number
Today we post free calling apps or
free calling trick without sim card , IN this trick you don’t need sim card for calling and its unlimited also by our trick. You just Download free app and then dial your friends number your call is connected then you can call freely also good feature is call quality is also very good so guys just try it.
How To Make Free Calls Without sim card

Just you need small internet for install this application.
1. Firstly Download Dingtone calling app CLICK HERE .
2. Install and Open Dingtone
3. Register For free account on it by entering name , profile, email and etc.
4. Accept terms and click on next
5. Done ! Now you can call freely without sim card.
Unlimited trick :
1. Now goto More option and click on get More Credit option.
2. Click on Refer and Earn option and then copy your refer link.
3. Now share it with your friends and earn upto 1000 free credit.
So friends this is the full guide for how to make free call without sim card. This app is really awesome and working very faster than other apps. The call quality is really very good.
Hope you guys like this trick. Share this trick with your friends if you like this trick. Keep visiting for latest updates.
free calling trick without sim card , IN this trick you don’t need sim card for calling and its unlimited also by our trick. You just Download free app and then dial your friends number your call is connected then you can call freely also good feature is call quality is also very good so guys just try it.
How To Make Free Calls Without sim card
Just you need small internet for install this application.
1. Firstly Download Dingtone calling app CLICK HERE .
2. Install and Open Dingtone
3. Register For free account on it by entering name , profile, email and etc.
4. Accept terms and click on next
5. Done ! Now you can call freely without sim card.
Unlimited trick :
1. Now goto More option and click on get More Credit option.
2. Click on Refer and Earn option and then copy your refer link.
3. Now share it with your friends and earn upto 1000 free credit.
DOWNLOAD DINGTONE CREDIT ADDER
Final Words :So friends this is the full guide for how to make free call without sim card. This app is really awesome and working very faster than other apps. The call quality is really very good.
Hope you guys like this trick. Share this trick with your friends if you like this trick. Keep visiting for latest updates.
Go to link download
Friday, March 24, 2017
Tor Browser 3 6 3 Use Tor on Windows Mac OS X or Linux without needing to install any software
Tor Browser 3 6 3 Use Tor on Windows Mac OS X or Linux without needing to install any software

The Tor software protects you by bouncing your communications around a distributed network of relays run by volunteers all around the world: it prevents somebody watching your Internet connection from learning what sites you visit, it prevents the sites you visit from learning your physical location, and it lets you access sites which are blocked.
The Tor Browser lets you use Tor on Windows, Mac OS X, or Linux without needing to install any software. It can run off a USB flash drive, comes with a pre-configured web browser to protect your anonymity, and is self-contained.
Here is the complete changelog:
- All Platforms
- Update Firefox to 24.7.0esr
- Update obfsproxy to 0.2.12
- Update FTE to 0.2.17
- Update NoScript to 2.6.8.33
- Update HTTPS Everywhere to 3.5.3
- Bug 12673: Update FTE bridges
- Update Torbutton to 1.6.11.0
- Bug 12221: Remove obsolete Javascript components from the toggle era
- Bug 10819: Bind new third party isolation pref to Torbutton security UI
- Bug 9268: Fix some window resizing corner cases with DPI and taskbar size.
- Linux:
- Bug 11102: Set Window Class to "Tor Browser" to aid in Desktop navigation
- Bug 12249: Dont create PT debug files anymore
Download Tor Browser 3.6.3
Go to link download
How to change IMEI Number Without Root
How to change IMEI Number Without Root
Hello!!! Visitors Today, i am going to share the trick, to change android IMEI number in just 5 minutes. Here, I will provide you the information about tricks and apps used. So our today’s topic is How to Change Android IMEI Number without root.

Advantages of This Trick:
- If you can change android IMEI number , then also your Android’s identity will be changed.
- Some of the applications asks for your IMEI number to verify your phone. It means you can’t use the same application next time in your phone but by changing your IMEI number, you can use that app again and again. (For example Mcent, Snapdeals, freecharge and other referral apps).
- Sometimes your device shows you SIM error, like invalid Sim or etc. This problem occurs due to your damaged IMEI number.
- We all know that nowadays Google Play-store provides us a lots of applications. Some of the apps pay us money for downloading the apps and for referring that app to our friends. But when someone tries to re download the same app that you have already downloaded before then the app will not pay you for this. Because the app get this information of your downloading through your android IMEI number. So, to get more profit from those apps you can change android IMEI number.
How To Check IMEI Number:
You can check your IMEI number by dailing *#06#.
Requirements:
1. Mobile Uncle Tool Download
2. Mind
3. Use this trick on your own risk.
Steps To Change IMEI Number In Android Phone Without Root:
1. First of all you need to download mobile uncle tool on your Android device. https://uploadocean.com/bh2ka933u1aa
2. After successfully downloading, install and open it.
3. Now main step, Select Engineer >> Engineer Mode (MTK) option and scroll down.
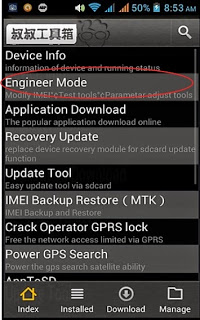
4. Find the option CDS Information, when you get that click on it..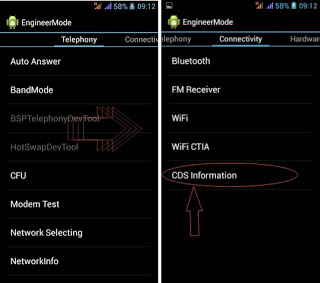
5. Click on Radio Information option »» you will see two options in this app called Phone 1 and Phone 2 »» click on Phone 2 option »»» you will see another new option AT+.
6. Now you need to replace AT+ to “ AT+(space)Your 15 Digit New IMEI Number “.
For Example: AT+ 123456789011156 »» click on SEND AT COMMAND to save your settings.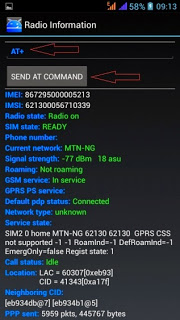
Finally , Your IMEI number will be Successfully changed. If you want to confirm !. Then Reboot your device and check your IMEI number again by dialing *#06#.
NOTE :
While changing your imei, should you get any response like; "command is not allowed in user build" . After clicking on COMMAND , instead of the normal "Command is sent!" Dont panic.
Just add one space between the AT+ and EGMR... That is AT+ space EGMR... Or just copy and paste this: AT+ EGMR=1,7,"IMEI Num" Then replace IMEI Num with the imei you generated.
Note: This tutorial is Only for Educational purpose. We are not responsible for any harm happened to you or your Android device by our methods. But our methods are tested and working. But if you have done any mistake in this process, as a result your android device can be damaged. Therefore, use this trick on your own risk.
Go to link download
Tuesday, March 21, 2017
How to Restore iOS 10 0 – 10 2 WITHOUT Updating to iOS 10 2 1
How to Restore iOS 10 0 – 10 2 WITHOUT Updating to iOS 10 2 1
How to Restore iOS 10.0 – 10.2 WITHOUT Updating to iOS 10.2.1
Today I’m gonna show you guys how to restore your IOS 10.2 iDevices for clean installation without losing the IOS 10.2 version this also work for ios 10.1.1 and IOS 9.2-IOS9.3 jailbreak firmware version. let’s get started this method will fix the issue where many users would open Cydia and once he opened up the yalu application would say already jailbroken.
How to Restore iOS 10.0/10.2 WITHOUT Updating
– First make itunes and icloud backup to make sure all your data is backup. make sure got back up. Use iTunes , this will save all your data including games and your health data. After all your date is safe you need to delete any ios updated form 10.2.1 or up into your OTA. delete any already download information.before we actually update you guys want to do this at your own risk I am not responsible for any data that will be lost. Use this method on your own risk. if you know what you are doing go ahead into general one scroll down to erase all data. What you guys are inside of reset choose to erase all content and settings now you guys will want to put in your passcode alright I guess what type will erase your device to the factory so this is what u should do. the phone will restart and erase all your data without the update.
How to Restore iOS 10.0 – 10.2 WITHOUT Updating to iOS 10.2.1
Go to link download
Sunday, March 12, 2017
TWRP CWM Custom Recovery Kaise Install Kare Without PC
TWRP CWM Custom Recovery Kaise Install Kare Without PC

Friends aapko is post me batayenge ki TWRP ( Team Win Recovery Project ) / CWM ( Clock World Mode ) recovery apne android phone me kaise install kare. Yadi aap jante hai ki custom recovery kya hoti hai aur iski kya jaroorat hai to aapko iska use maalum hoga aur aap samajh gaye honge ki ye post kislie hai but yadi aap nahi jante to sabse pehle aapke liye ye janna jaroori hai.
Hamare phone me jo recovery hoti hai wo stock rom ke sath already installed aati hai jise stock recovery kehte hai. Iska ka use ham phone ko factory reset karne, wipe data, cache clear etc. ke liye karte hai. Apne phone ko recovery mode me dalne ke liye sabse pehle apna phone switch off kare iske volume up + home + power key 5-6 second tak press kare rakhe ( kuch phone ki process alag hoti hai. Jaanne ke liye apne phone ke model number ke aage recovery mode likhkar google me search kare ) iske baad aap recovery mode me chale jayenge.
Custom recovery third party hoti hai jo ki developers ke dwara develop ki jati hai. Isme kuch extra features hote hai. Yadi aapke phone me custom recovery hai to aap koi bhi rom bina pc ki madad ke apne phone se hi install kar sakte hai. Jaise aapka phone kitkat hai to aap lolipop rom download karke bina pc ke apne phone se hi custom recovery ki madad se lolipop ki zip file ko install karke apne phone ko lolipop bana sakte hai, apne phone ki purani rom, data, boot screen ka backup bana sakte hai. Aise aur bhi bohot se works hai jo ki aap stock recovery me nahi kar sakte but iski madad se aasani se kar sakte hai.
Waise to bahut si custom recoveries internet me uplabdh hai but 2 hi sabse famous hai, sabse jyada use hoti hai aur jinke features bahut acche hai wo hai 1st TWRP ( TeamWin Recovery Project ) 2nd CWM (ClockWorld Mode ), isliye post me inhi ke baare me bas bataya gaya hai.
CWM Aur TWRP Recovery Me Kya Antar Hai
CWM - CWM ( ClockWorld Mod ) bhi stock recovery ki tarah sound, home aur switch button se work karti hai. Isme sabhi features hai. Isme aap apne phone ke system, file aur old rom ka backup bana sakte hai jisse ki new rom ke installation me kuch problem aane par phir se purana rom restore kar sake. Isme factory data reset kar sakte hai, system reset kar sakte hai aur custom rom bina pc ke install kar sakte hai.
TWRP - TWRP ( TeamWin Recovery Project ) ke features bhi cwm ki tarah hai. Isme kuch extra features bhi hai. Isme aapko time, phone ka battery percentage bhi show hota hai. Rom ke installation, backup aur restore me jyada samay nahi lagta aur koi problem bhi nahi aati hai. Ye touch base par work karti hai. Isme aap sabhi work bina button ka use kare touch ki mada se kar sakte hai. Ye meri favourate hai aur mai iska hi use karta hu. Mai aapko bhi isi ko suggest karunga, aap bhi isi ka use kare.
CWM / TWRP Custom Recovery Kaise Install Kare
Mai yaha aapko 2 methods bataunga. Aap jis method se karna chahe kar sakte hai. Sabse pehle apne phone ko supersu root karna padega. Apne phone ko supersu root kaise kare post read karke aap apne phone ko root kar sakte hai.
First method -:
1. Google me apne phone ka model number likhkar TWRP ya CWM jo bhi install karna hai wo likhe aur xda likhe.
Example - smasung j7 twrp xda
2. Ab aapko search result me xda developer ki site ki post show hogi use open kare.
3. Ab waha se recovery ki file download kare jo ki zip me hogi.
4. Ab es file explorer ki mada se us download ki hui zip ko open kare.
5. Ab usme aapko recovery.img file show hogi use select karke extract kare.
6. Rashr app playstore se download kare.
8. Upper right corner me backup option diya hai waha se apni purani recovery ka backup banaye jisse ki kuch problem aane par ya jaroorat padne par restore kar sake.
9. Recovery from storage option select kare.
10. Ab jis folder me recovery.img file extract kiye the waha se ise select kare.
11. Ab aapko ek warning messege show hoga waha yes select kare.
12. Ab flash ki process 4-5 second chalegi uske baad aapse reboot option show hoga to usme reboot recovery option select kare.
13. Ab aapka phone reboot hoga aur phone on hone par recovery mode me chale jayega. Aap dekhenge ki aapke phone me custom recovery successfully install ho chuki hai. Ab waha se reboot option choose karke apne phone ko on kare.
Done
Example - smasung j7 twrp xda
2. Ab aapko search result me xda developer ki site ki post show hogi use open kare.
3. Ab waha se recovery ki file download kare jo ki zip me hogi.
4. Ab es file explorer ki mada se us download ki hui zip ko open kare.
5. Ab usme aapko recovery.img file show hogi use select karke extract kare.
6. Rashr app playstore se download kare.
Download Rashr
7. Install hone ke baad open kare aur root access puchega use grant kare.8. Upper right corner me backup option diya hai waha se apni purani recovery ka backup banaye jisse ki kuch problem aane par ya jaroorat padne par restore kar sake.
9. Recovery from storage option select kare.
10. Ab jis folder me recovery.img file extract kiye the waha se ise select kare.
11. Ab aapko ek warning messege show hoga waha yes select kare.
12. Ab flash ki process 4-5 second chalegi uske baad aapse reboot option show hoga to usme reboot recovery option select kare.
13. Ab aapka phone reboot hoga aur phone on hone par recovery mode me chale jayega. Aap dekhenge ki aapke phone me custom recovery successfully install ho chuki hai. Ab waha se reboot option choose karke apne phone ko on kare.
Done
Second Method -:
1. Playstore se flashify app download kare.
3. Backup / restore option se current recovery ka backup banaye.
4. Iske baad flash option me jakar recovery image option choose kare.
5. Ab waha par downloar twrp, download cwm etc. options diye hai. Inme se jo bhi aapko download karna hai us option ko choose kare.
6. Ab apne phone ka model number choose kare.
7. Ab .img file ka version choose kare. ( new version ki hi file download kare )
8. Choose karne ke baad file ko find karne ke liye loading hogi iske baad download option show hoga to download kare.
9. File download hone ke baad flash ka option aayega usme yes select kare.
10. Ab reboot ke options aayenge to usme reboot recovery option select kare.
11. Ab aapka phone reboot hone ke baad recovery mode me chala jayega. Ab aap dekhenge ki aapke phone me aapki select ki hui custom recovery install ho gayi hai. Waha se reboot option select kare. Iske baad aapka phone on ho jayega.
Done
Download Flashify
2. Install hone ke baad open kare aur root permission grant kare.3. Backup / restore option se current recovery ka backup banaye.
4. Iske baad flash option me jakar recovery image option choose kare.
5. Ab waha par downloar twrp, download cwm etc. options diye hai. Inme se jo bhi aapko download karna hai us option ko choose kare.
6. Ab apne phone ka model number choose kare.
7. Ab .img file ka version choose kare. ( new version ki hi file download kare )
8. Choose karne ke baad file ko find karne ke liye loading hogi iske baad download option show hoga to download kare.
9. File download hone ke baad flash ka option aayega usme yes select kare.
10. Ab reboot ke options aayenge to usme reboot recovery option select kare.
11. Ab aapka phone reboot hone ke baad recovery mode me chala jayega. Ab aap dekhenge ki aapke phone me aapki select ki hui custom recovery install ho gayi hai. Waha se reboot option select kare. Iske baad aapka phone on ho jayega.
Done
Last Words
TWRP aur CWM me sabse best TWRP hai aur ye sabse popupar hai. Iska use adhiktar hota hai aur ye operate karne me bhi easy hai, to me aapko isi ko recommend karunga.
First method jyada easy hai. Second method me flashify app ka use kiya gaya hai jo ki kuch phones me work nahi karta isliye sabse pehle first method hi try kare. First method me koi problem hoti hai to hi second method use kare.
Aapko ye post kaisi lagi hame comment me batayen, is post se related koi question ya pareshani ho to aap hamse comment me pooch sakte hai. Ye post apne friends ke sarh bhi share kare. Hamare blog ki new post email dwara pane ke lie hamara blog subscribe kare aur fb par pane ke liye hamara facebook page like kare.
Go to link download
Saturday, March 11, 2017
How can one download YouTube videos Android Pc Windows phone without any software
How can one download YouTube videos Android Pc Windows phone without any software
You can download YouTube video without installing any plugin or app. Just follow the below steps:

1. Go to youtube and open the video that you want to download. This see screenshot below.
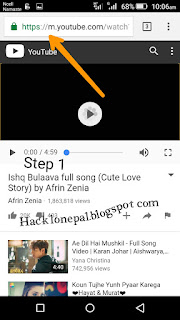
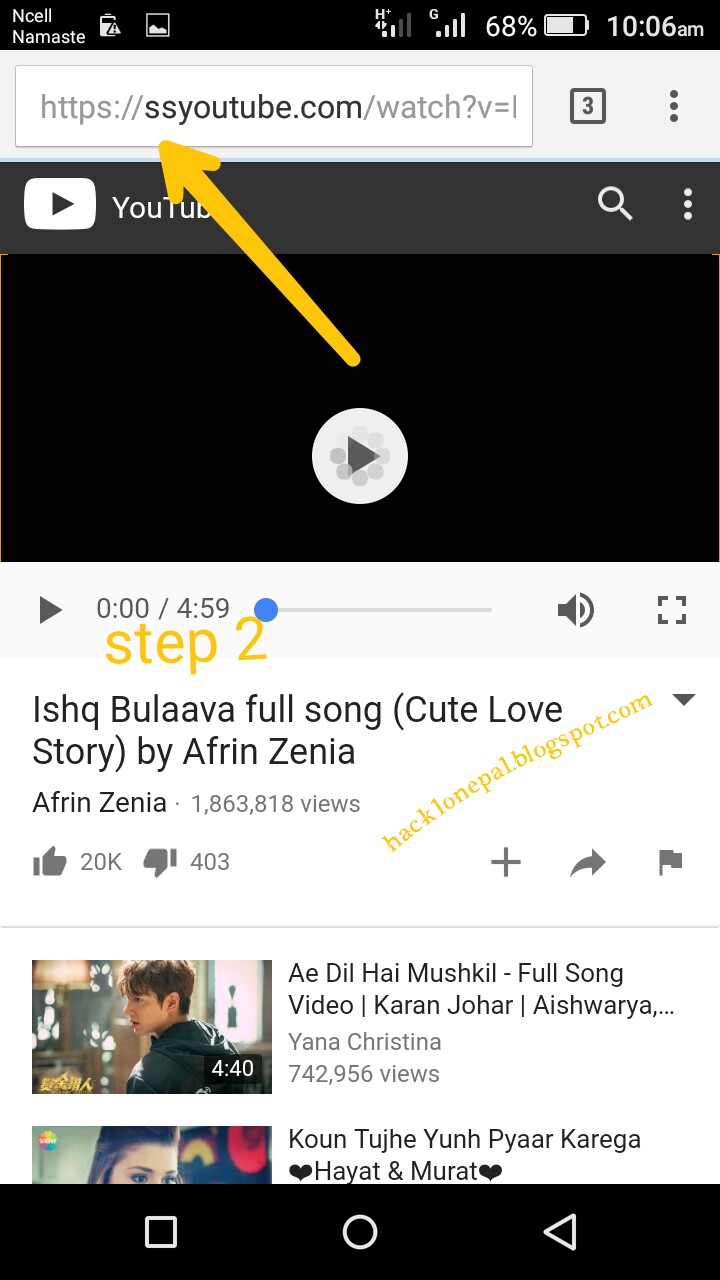
2. Got to the address bar and add "ss" without the qoutes and spaces just in front of the "y" in youtube.
For example:
NormalUrl= https://m.youtube.com/watch?v=Bo6INE0H25s
Urlwith"ss" =https://ssyoutube.com/watch?v=Bo6INE0H25s
3. Finally, this opens a new page that has different formats of the video that you want to download like, mp4, flv, 3gp and others. Choose your preferred format. This will automatically start downloading your video. Also see the screenshot below.
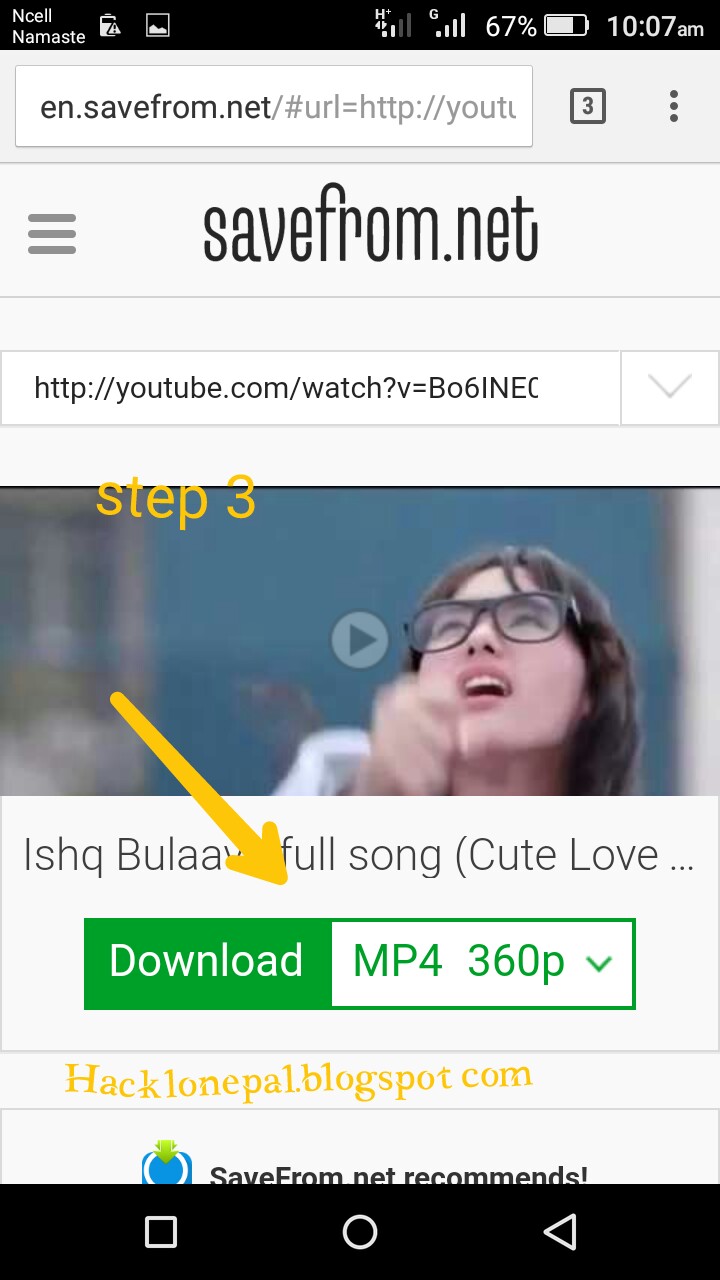
NOTE: These screenshots are made with Android Phone. However, that does not mean that it works only on Android phones. As I have said before, you can use this on your pc, symbian, java, windows among others. Meanwhile, for those using PC/Android, you can alternatively use IDM/tubemate to download from youtube.
Go to link download
Android Phone Ko Without PC Root Kaise Kare For All Android Phone
Android Phone Ko Without PC Root Kaise Kare For All Android Phone

Hi friends, Is post me ham aapko batayenge ki android phone ko root kaise karte hai bina pc ke. Aap logo ne mobile root ke baare me suna hi hoga. Yadi aap nahi jante honge to ham aapko is post me root ki poori jankari denge ki mobile rooting kya hoti hai, iske kya fayde hai, kya nuksaan hai.
Yadi isko simple shabdo me kahe to aap mobile ko root karke uske saath full customization kar sakte hai.
Yadi isko simple shabdo me kahe to aap mobile ko root karke uske saath full customization kar sakte hai.
Mobile Rooting Kya Hota Hai
Root ka matlab hindi me ??? hota hai. Aap apne phone ko root karke apne phone ki ??? tak ja sakte hai. Apne phone ke OS ( operating system ) ke sath changing kar sakte hai, Jo ki aap without rooted phone me nahi kar sakte.
Mobile Ko Root Karne Ke Fayde Aur Nuksaan
Mobile ko root karne ke fayde to bohot hai but kuch nuksaan bhi hai jo ki aapke lie jaanna jaroori hai.
Fayde
1. Pre - installed Apps Ko Uninstall Kar Sakte Hai
Hamare phone me bohot se apps pehle se installed aate hai, jinme se kuch apps hi kaam ke hote hai aur baaki ke hamare phone ki storage & ram khaate hai. Ye apps unistall bhi nahi hote hai but phone ko root karne ke baad aap aasani se inhe uninstall kar ke apne phone ki ram and speed increase kar sakte hai.
2. Install Rooted Apps
Aise bohot se apps hai jo ki sirf rooted phone me bas install hote hai aur inke features bhi without rooted phone se acche hote hai. Example ke liye screen recorder app, screen recorder apps sirf rooted phone me work karte hai. Kuch screen recorders without rooted phone ke lie bhi aate hai but kuch khaas features nahi rehte hai.
3. Ad Block Kar Sakte Hai
Android phone ke 70% se jyada apps me ads show hote hai jo ki phone ki battery ke saath saath data ki bhi khapat karte hai aur app ko run karne me bhi problem hoti hai. Rooted phone me sabhi apps ke ads block kar sakte hai, jis se un apps me dobara ads show nahi honge.
4. Mobile Ki Speed Increase Kar Sakte Hai
Yadi aapka phone hang hota hai to aap apne phone ko root karke usme se kaam na aane wale system ke apps uninstall karke aur ads block karke apne phone ki speed increase kar sakte hai.
5. Phone Ki Battery Life Increase Kar Sakte Hai
Android phone ke bohot se system apps koi kaam ke nahi hote hai aur wo background me work karte hai jisse battery ki khapat hoti hai. Apne phone ko root karne ke baad aap aise apps ko uninstall karke apne phone ki battery life increase kar sakte hai.
Ye sab points ke alawa aur bhi bohot se work hai jo ki sirf rooted phone me bas kie ja sakte hai. Kyoki phone ko root karne ke baad phone ke UI ( user interface ) par hamara full control hota hai. Yadi aapko hacking seekhna chahte hai to bhi aapko rooted phone ki jaroorat padegi.
Ye sab points ke alawa aur bhi bohot se work hai jo ki sirf rooted phone me bas kie ja sakte hai. Kyoki phone ko root karne ke baad phone ke UI ( user interface ) par hamara full control hota hai. Yadi aapko hacking seekhna chahte hai to bhi aapko rooted phone ki jaroorat padegi.
Nuksaan
1. Phone Dead Ho Sakta Hai
Waise to rooting ek safe process hai but kabhi kabhi phone root karte samay brick ho jata hai. Aise cases bohot kam hote hai but fir bhi phone root karte samay sabhi instructions carefully follow kare.
2. Warranty Problem Ho Sakti Hai
Bohot se phone rooting allow nahi karte hai, kyoki isse aap phone ke root ( ??? ) tak ja sakte hai aur phone ki security ko bhi nuksan pahucha sakte hai. Bohot se phone aise bhi hai jo rooting allow karte hai.
Yadi aapka phone warranty period me hai aur aapka phone rooting allow nahi karta hai to phone ko root karte time ya root karne ke baad kabhi bhi aaoke phone me koi problem hoti hai to aap warranty ka fayda nahi utha sakte hai.
Yadi aapka phone warranty period me hai aur aapka phone rooting allow nahi karta hai to phone ko root karte time ya root karne ke baad kabhi bhi aaoke phone me koi problem hoti hai to aap warranty ka fayda nahi utha sakte hai.
3. Only Custom Rom Install Kar Sakte Hai
Sabhi mobile compenies new updates deti rehti hai jisse aap directly apne phone ko update kar sakte hai but phone root karne ke baad aapko company se upadate nahi milenge but aap custom roms ki madad se apne phone ko update kar sakte hai.
4. Virus Attack Aasani Se Ho Sakta Hai
Jaisa ki mene aapko bataya ki phone root karne ke baad ham mobile ki jad tak ja sakte hai theek waise hi yadi koi person aapke phone ki jad tak koi virus inject karna chahe to kar sakta hai. Waise to virus without rooted phone me bhi inject kiye ja sakte hai. Yadi aapko pata hi nahi hai ki jo app aap install kar rahe hai usme virus hai ya nahi to aapka phone rooted ho ya na ho aap iske shikaar ho jayenge. Isile unknown email, message se aaye hue kisi bhi app ko ya link ko lalach me aakar install and open na kare.
Android Phone Ko Bina PC Ke Root Kaise Kare
Waise to pc ki madad se koi bhi phone aasani se root ho jata hai but without pc ke kai phone me thodi problem hoti hai. Ho sakta hai ki is method se aapka phone root na ho Islie mai yaha aur bhi kuch apps ki link neeche diya hu aap unhe bhi try kar sakte hai. Method batane se pehle kuch requirements hai jo ki aap apne phone ko root karne se pehle poori kar le.
Requirements :
1. Internet connection
2. 60% battery
3. Some risk ?
2. 60% battery
3. Some risk ?
Mobile Phone Root Karne Ke Liye Methods
1. Kingroot app install kare aur open kare.
Download Kingroot
2. Check for root button par click kare.
3. 5-10 minute ki loading lega uske baad aapka phone reboot hoga.
Itna karne ke baad aapka phone successfully root ho jayega.
Download Kingroot
2. Check for root button par click kare.
3. 5-10 minute ki loading lega uske baad aapka phone reboot hoga.
Itna karne ke baad aapka phone successfully root ho jayega.
Apps For Root :
1. Kingroot
2. Framaroot
3. I-Root
4. Vroot
5. Kingoroot
6. Z4Root
7. CF root
8. Towelroot
2. Framaroot
3. I-Root
4. Vroot
5. Kingoroot
6. Z4Root
7. CF root
8. Towelroot
Extra Method :
Waise to inme se kisi na kisi app se aapka phone root ho hi jayega lekin yadi nahi hua to aap is step ko follow kar sakte hai.
1. Google.com open kare.
2. Search box me type kare " how to root mobile name without pc ". Mobipe name ki jagah apne phone ka name + model nu. likhe aur search kare.
3. Aapko jo results show honge unhe open kare aur unke steps follow kare.
2. Search box me type kare " how to root mobile name without pc ". Mobipe name ki jagah apne phone ka name + model nu. likhe aur search kare.
3. Aapko jo results show honge unhe open kare aur unke steps follow kare.
Aapko ye post kaisi lagi hame comment me batayen, is post se related koi question ya pareshani ho to aap hamse comment me pooch sakte hai. Ye post apne friends ke sarh bhi share kare. Hamare blog ki new post email dwara pane ke lie hamara blog subscribe kare aur fb par pane ke liye hamara facebook page like kare.
Go to link download
Wednesday, March 1, 2017
WhoIsConnectedSniffer Detect who is connected to your network without scanning
WhoIsConnectedSniffer Detect who is connected to your network without scanning

WhoIsConnectedSniffer is a network discovery tool that listens to network packets on your network adapter using a capture driver (WinpCap or MS network monitor) and accumulates a list of computer and devices currently connected to your network. WhoIsConnectedSniffer uses various protocols to detect the computers connected to your network, including ARP, UDP, DHCP, mDNS, and BROWSER.
For every detected computer or device, the following information is displayed: (Some of the fields might be empty if the information cannot be found inside the packets) IP Address, MAC Address, name of the device/computer, description, Operating System, Network Adapter Company, IPv6 Address.
After collecting the connected computers/devices information, you can easily export the list to tab-delimited/comma-delimited/xml/html file.
Start Using WhoIsConnectedSniffer
Except of the capture driver, WhoIsConnectedSniffer doesnt require any installation process or additional dll files. In order to start using it, simply run the executable file - WhoIsConnectedSniffer.exe
After running WhoIsConnectedSniffer in the first time, you should choose the correct capture driver and the network adapter you want to use.
After you choose the desired capture driver and the network adapter, WhoIsConnectedSniffer starts to listen the packets on your network adapter and updates the main window when a device or computer is detected.
You have to wait from a few seconds to a few minutes until the first computers/devices appear on the main window of WhoIsConnectedSniffer.
After collecting the connected computers/devices information, you can easily export the list to tab-delimited/comma-delimited/xml/html file by selecting all items (Ctrl+A), and then using the Save Selected Items option (Ctrl+S).
Protocols supported by WhoIsConnectedSniffer
- ARP:WhoIsConnectedSniffer listens to this protocol to get the IP address and MAC address of computers and devices.
- UDP:When a computer broadcasts a UDP packet to all other computers, WhoIsConnectedSniffer extracts from it the IP address and the MAC address.
- DHCP:When a computer connects to the network, it usually sends a DHCP request. WhoIsConnectedSniffer uses this request to get the host name and IP address of the computer.
- mDNS:This protocol is used on Linux and Mac OS systems. WhoIsConnectedSniffer uses it to get the host name and IP address of the computer, and also the operating system (on Linux)
- BROWSER:This protocol is mainly used by Windows, but some Linux systems supports this protocol too. WhoIsConnectedSniffer uses it to get the name of the computer, description text of the computer, and the operating system.
Download WhoIsConnectedSniffer
Go to link download
Tuesday, February 28, 2017
KingRoot KingUser Ko SuperSu Se Replace Kaise Kare Without PC
KingRoot KingUser Ko SuperSu Se Replace Kaise Kare Without PC

Friends aap log mobile root ke bare me to jante hi honge. Yadi nahi jante ho to sabse pehle aap ye post read kare - mobile root kya hai aur apne phone ko root kaise kare.
Is post me ham aapko batayenge ki yadi aapne apna phone kingroot se root kiya hai to usko SuperSu me convert kaise karte hai.
Root ki methods alag alag hoti hai. Yadi aap apne phone ko computer / laptop ki madad se root karte hai to adhiktar methods me SuperSu already installed aata hai but yadi aap apne phone ko without pc kingroot ya kinguser madad se root karte hai to aapko ye installed nahi milta. Lekin aap is post ki madad se apne kingroot ki jagah ise replace kar sakte hai.
Sabse pehle aapke liye ye jaanna jaroori hai ki SuperSu kya hai. Maan lete hai ki aapne apne phone ko kingroot ki madad se root kiya hai. Jab aap apne phone me kisi bhi rooted apps ko enter karte hai to wo aapse kingroot ki permission mangta hai jise grant ya deny karna hota hai. SuperSu bhi rooted apps ko permission deta hai but ye sabse accha hai root permission ke liye aur bohot se rooted apps sirf SuperSu permission par work karte hai. Bohot se aise works hai jo ki aap kingroot permission par nahi kar sakte, aapko SuperSu permission ki jaroorat padegi. But aapko apna phone direct SuperSu root karna hai to pc ki jaroorat padegi isliye aap hamari post phone ko without pc root kaise karte hai read karke simple root kare uske baad ye post read karke ise install kare.
KingRoot / KingUser Root Ko SuperSu Se Replace Kaise Kare
Mai yaha aapko 2 methods bata raha hu aapko jo method easy lage aap uska use kar sakte hai.
1st Method -:
1. Sabse is SuperSu ki zip file ko download kare.
3. Mrw folder ko internal storage me extract kare.
4. Ab play store se Terminal Emulator download kare.
6. Su type kare aur enter kare. Iske baad aapse root permission mangenga use grant kare.
7. sh /sd card/mrw/root.sh type kare aur enter kare.
8. Iske baad aapko kuch errors show hongi aur aapka phone reboot hoga.
9. Phone on hone ke baad dekhe aapka purana root app ki jagah SuperSu app le lega.
10. App open kare. Open karne par update ka option aayega. Continue me click kar update kare.
Download Zip
2. Ab ise es file explorer ki madad se open kare. Open karne par aapko iske andar mrw name ka folder milega.3. Mrw folder ko internal storage me extract kare.
4. Ab play store se Terminal Emulator download kare.
Download Terminal Emulator
5. Terminal emulator install hone ke baad open kare.6. Su type kare aur enter kare. Iske baad aapse root permission mangenga use grant kare.
7. sh /sd card/mrw/root.sh type kare aur enter kare.
8. Iske baad aapko kuch errors show hongi aur aapka phone reboot hoga.
9. Phone on hone ke baad dekhe aapka purana root app ki jagah SuperSu app le lega.
10. App open kare. Open karne par update ka option aayega. Continue me click kar update kare.
Done
2nd Method -:
1. SuperSu Me app play store se install kare.
Download SuperSuMe
( Note : ye app paid hai )
2. Install hone ke baad open kare.
3. Open karne ke baad aap dekhenge ki ek gol button hogi jisme android ka logo bana hua hai usme click kare.
4. Click karte hi replacing process start ho jayegi. Isme 3 se 5 minute lagega.
5. Process compelete hone ke baad apna phone reboot ya restart kare.
6. Ab menu me jakar dekhe aapke old root app ki jagah SuperSu show hoga. Ise open kare aur update kare.
Download SuperSuMe
( Note : ye app paid hai )
2. Install hone ke baad open kare.
3. Open karne ke baad aap dekhenge ki ek gol button hogi jisme android ka logo bana hua hai usme click kare.
4. Click karte hi replacing process start ho jayegi. Isme 3 se 5 minute lagega.
5. Process compelete hone ke baad apna phone reboot ya restart kare.
6. Ab menu me jakar dekhe aapke old root app ki jagah SuperSu show hoga. Ise open kare aur update kare.
Done
Aapko ye post kaisi lagi hame comment me batayen, is post se related koi question ya pareshani ho to aap hamse comment me pooch sakte hai. Ye post apne friends ke sarh bhi share kare. Hamare blog ki new post email dwara pane ke lie hamara blog subscribe kare aur fb par pane ke liye hamara facebook page like kare.
Go to link download
Subscribe to:
Posts (Atom)